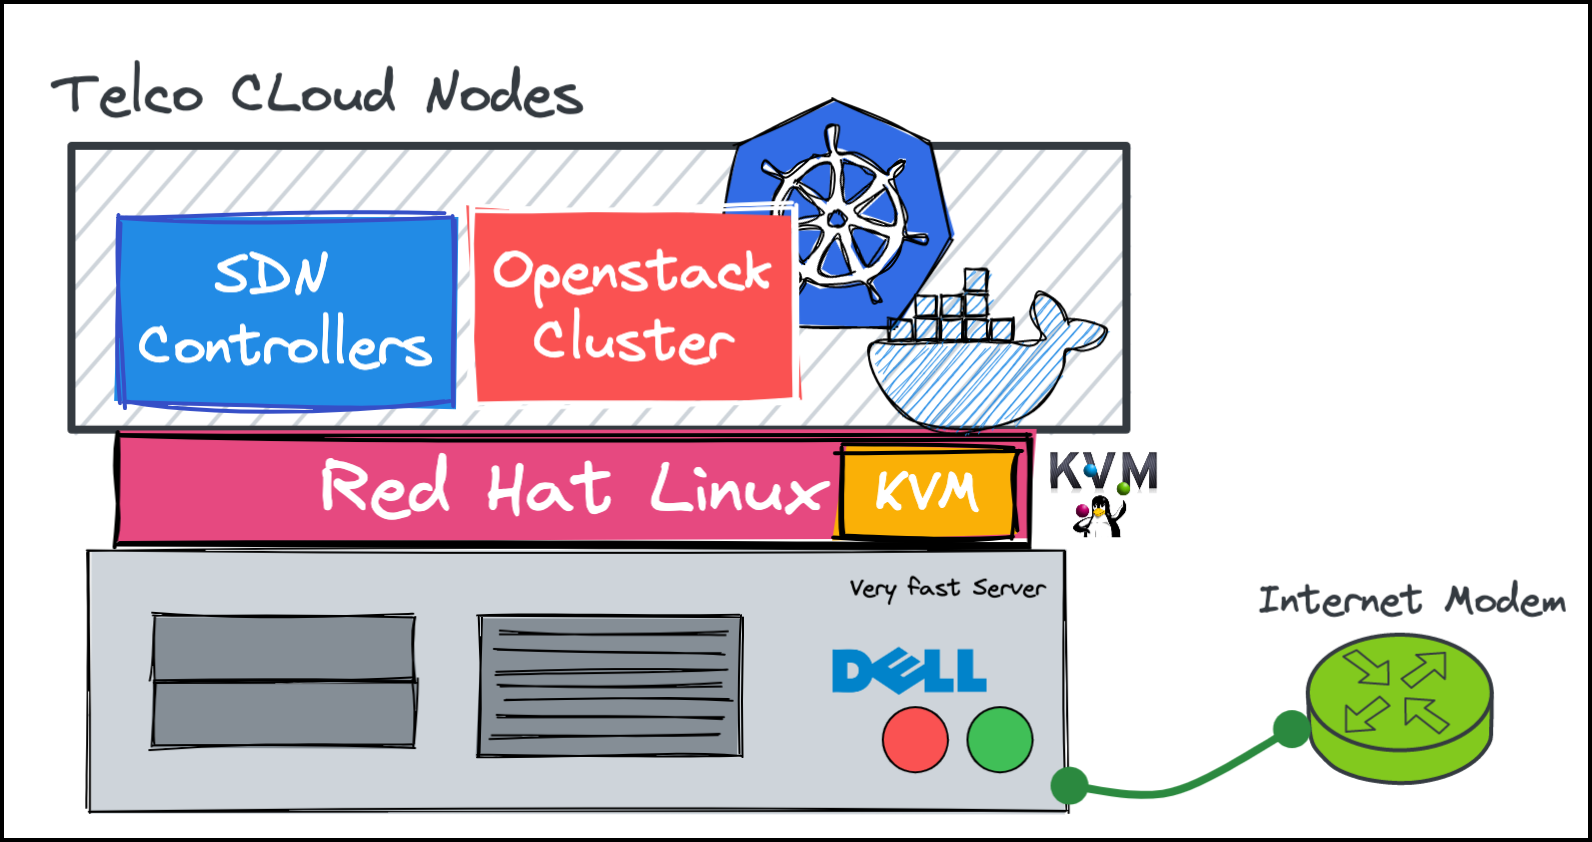
TL;DR in this post, I’ll try to show you benfits of using EVE-NG over baremetal for your homelab and how to migrate from KVM to EVE
Since the nodes are virtual machines, then it’s easy to take snapshots with command like virsh snapshot-create-as --domain {VM-NAME} --name "{SNAPSHOT-NAME}" and easily revert later when things go south (and this is happen a lot 😀 )
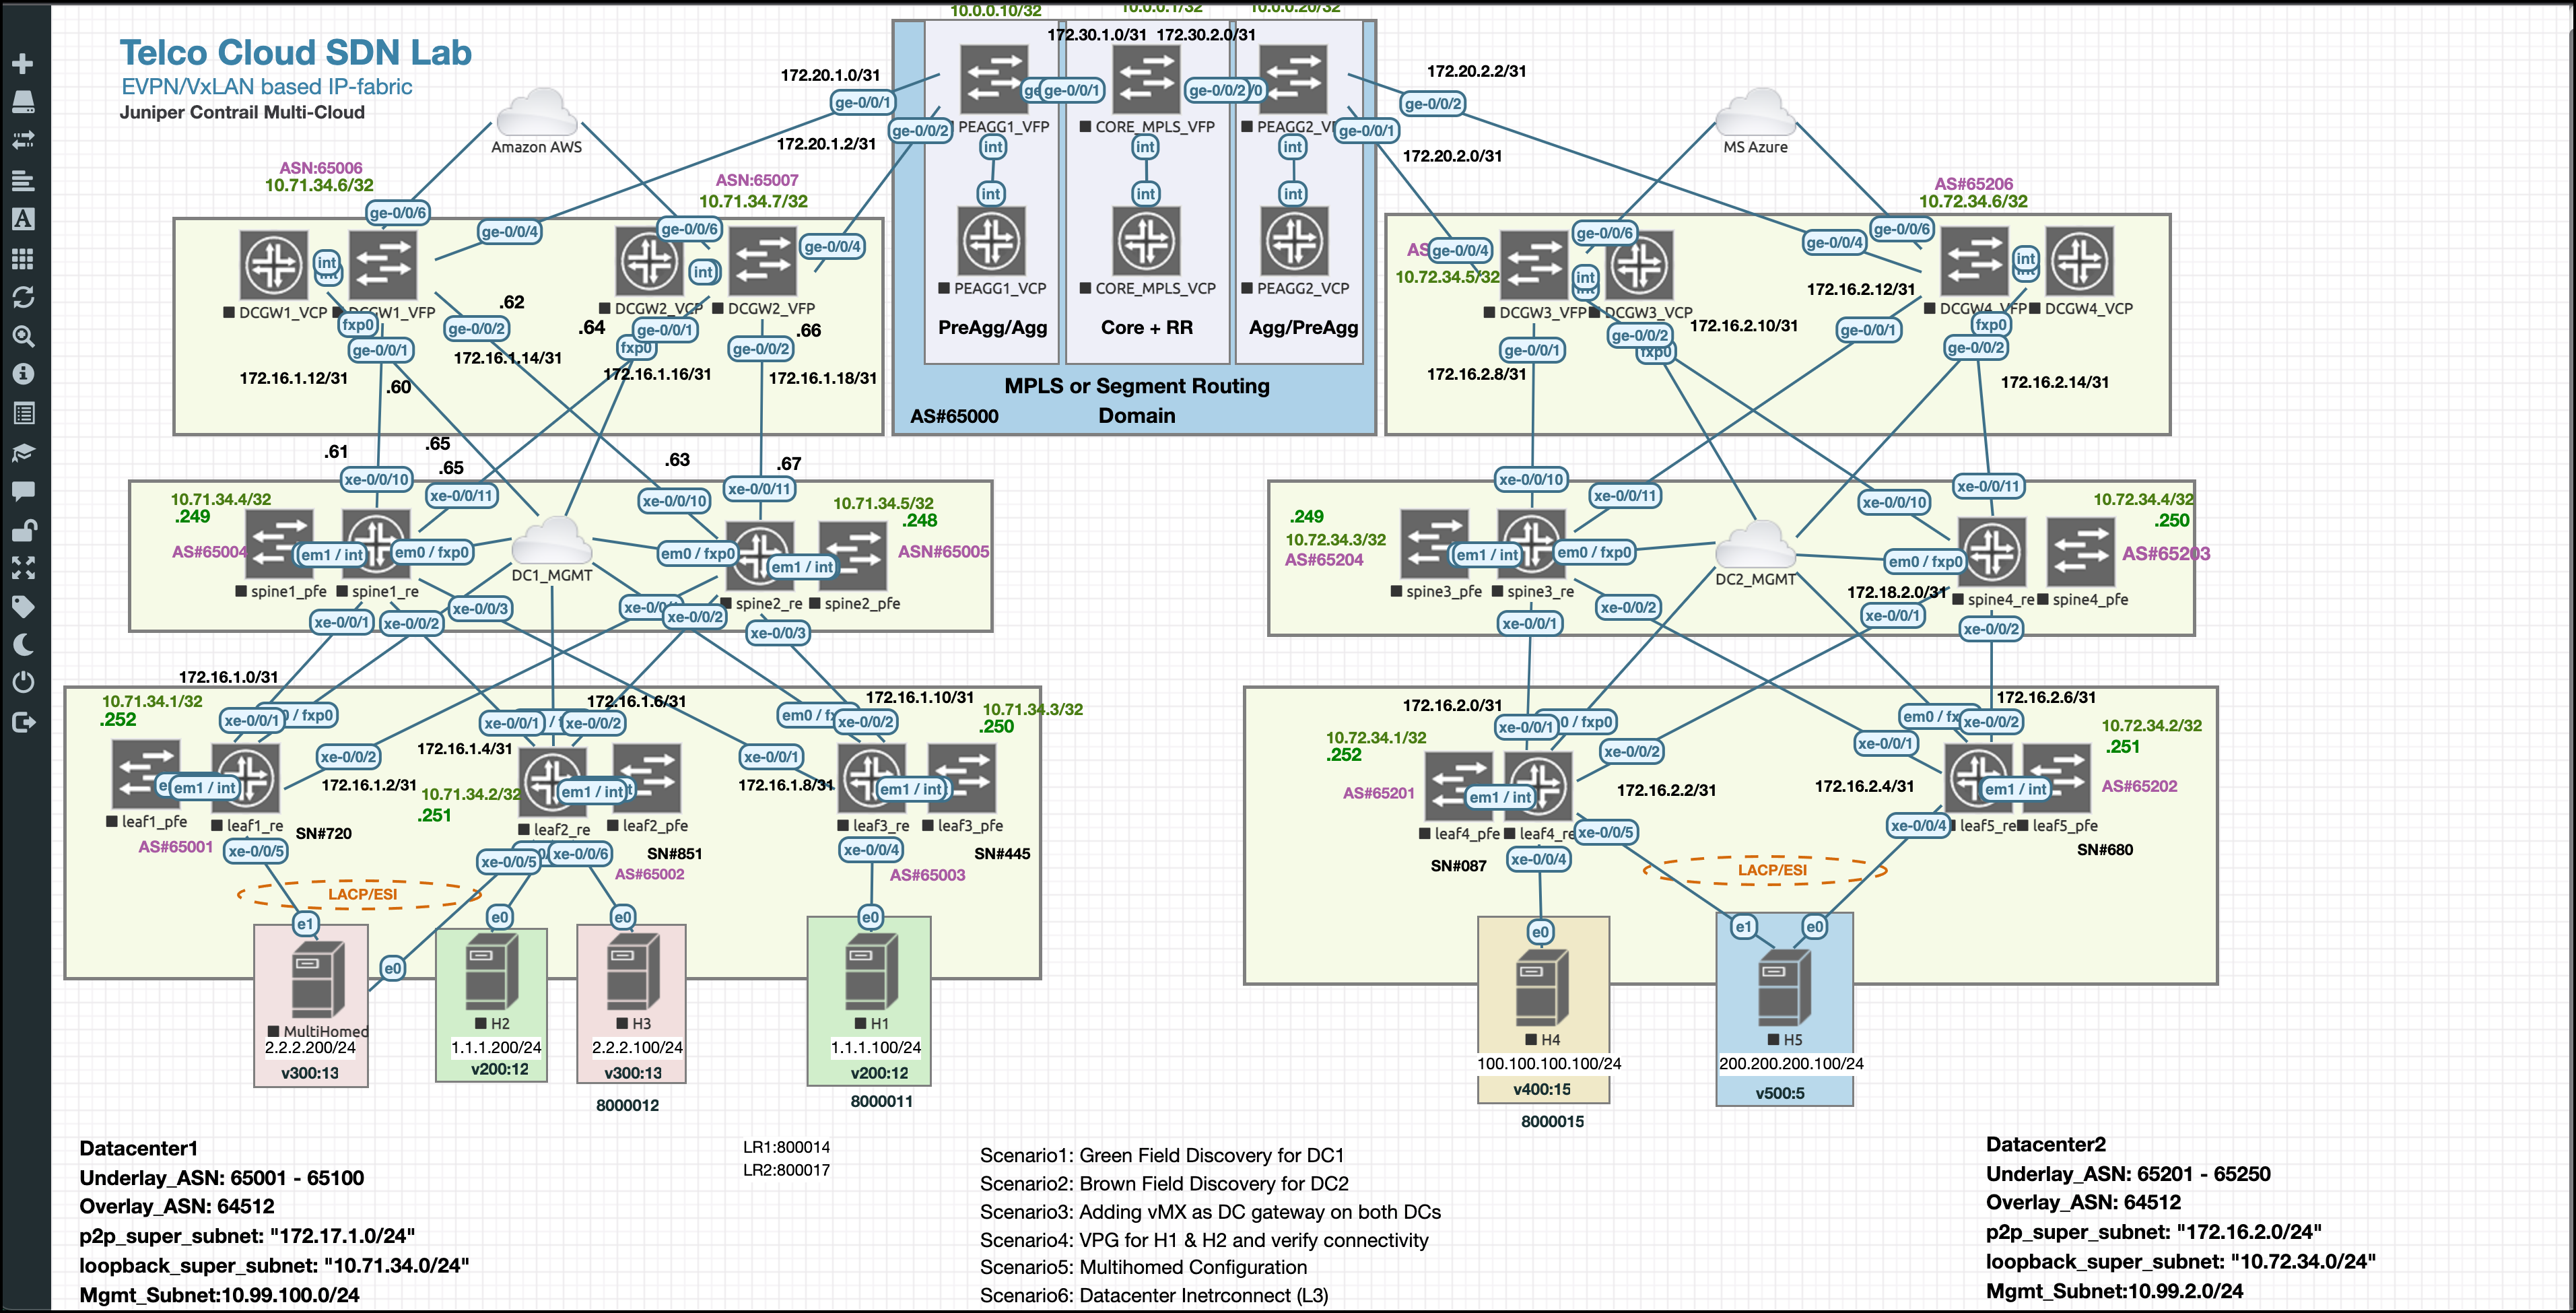
Finally, to have a full TelcoCloud lab, You need to add network topologies like IP-Fabric with EVPN/VxLAN. I found the EVE-NG is really good in dealing with network nodes from different vendors….and here it comes the problem!

The lab becomes “Too Complex to manage!”. I have to deal with two different hypervisors (KVM and EVE-NG in that case) and each one of them contains and manages its own nodes. Also, the inter-working between them is not intuitive and you have to manage multiple bridges at each side.
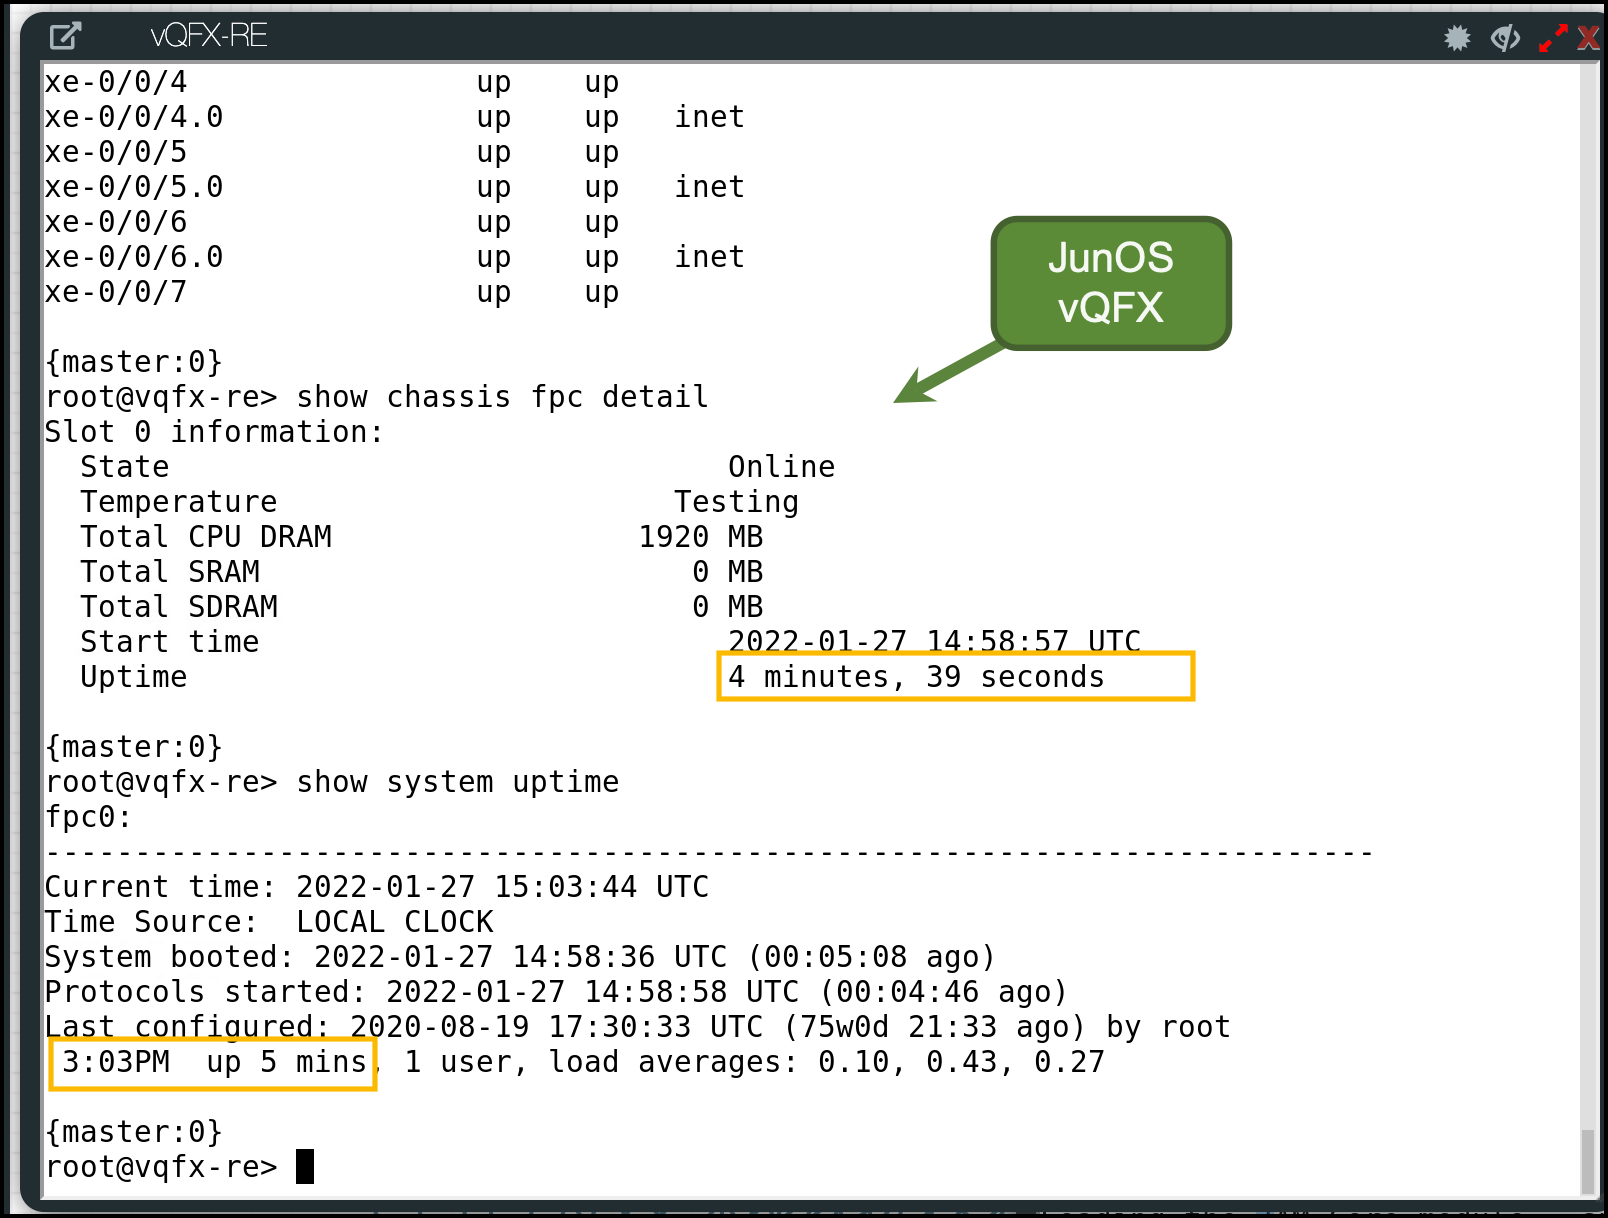
Finally, some VMs are working great over the KVM but when I load it to the eve-ng hypervisor, it stops working and became buggy (Example Juniper vQFX)
it’s become time-consuming to build and manage large labs and I start to feel it’s a big task to play with new solutions over the homelab.
Want more reasons? Sure! Here’re few:
- The nested virtualization is bad thing!. if you deploy something like openstack compute as a VM over the EVE-NG (which is a VM itself hosted over KVM) you will get terrible performance. Also, it became worse (and almost impossible) to deploy a VM over that virual compute

- The KVM doesn’t have a topology designer or viewer for the hosted nodes. I find myself struggling in understanding how nodes are connected with each other. I keep executing commands like
virsh domiflist $domain_nameover the nodes and drawing the result on on a paper.
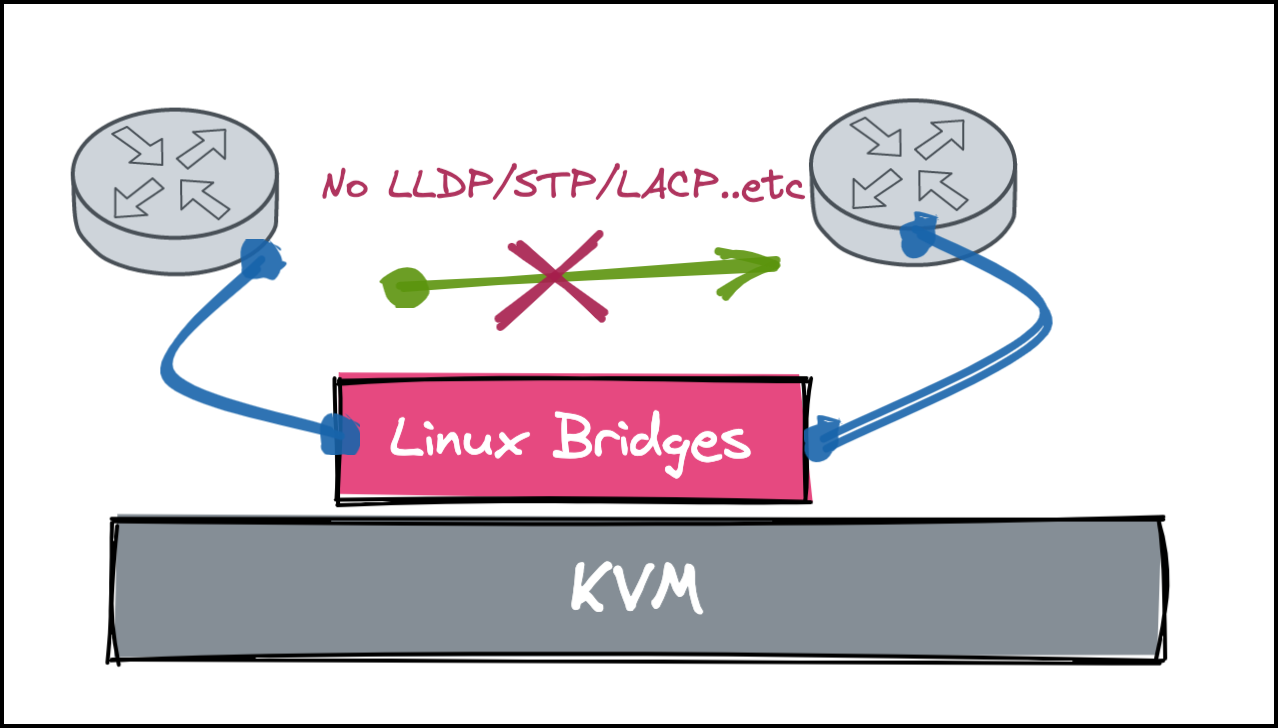
- Also, when it came to layer 2 protocols (like MAC addresses used by LLDP, LACP, STP, 802.1X, PBB control plane), The KVM bridges are dropping them by default (Yes there’s a way to re-compile the Linux kernel to allow those but it’s a bit complex over RHEL).
- Finally, The KVM is not optimized by default. You have to configure things yourself like memory optimization with UKSM, Forwarding in SYSTCL and bridging iptables…etc to get the best of it.
Conclusion: The KVM itself is really powerful. However, if you always deal with a compo of virtual machines and network topologies and want interconnect with each other then it become hard.
Solution?
Simple, let’s remove the KVM completely and depend only on EVE-NG!. Many folks are saying that using eve-ng directly on bare-metal (not as a VM) is a pleasant experience when it came enhancing the performance of the hosted nodes.
However, I have a problem!. How to migrate my existing VMs (which have a lot of snapshots) to the EVE-NG?? I don’t want to re-build and install everything from scratch.
There’s a solution for that problem, but first let’s understand the full picture and start with the limitations (AKA, known-behaviours 😉 )
Understanding the limitations upfront:
There’re some caveats (& workarounds for them) that I’d like to discuss first before doing the migration
- No virsh tools are available.
The eve-ng is not using LibVirt API to manage its qemu backend, rather it depends on some wrapper scripts to manage the VMs (by calling the qemu-system-x86 directly). what’s the issue of that? We can’t take snapshots! 😱 —> No worries. we will see how to overcome this by the end of the post
- No support for VirtualBMC
If you’re using the vBMC (Virtual BMC) to emulate IPMI operations with the VMs then this is not supported 😦 (As it depends again on LibVirt API the KVM domains) —> As a workaround, use the script by end of the post to automatically power-off and power-on instead.
Migration Steps
Enough talk, let’s start the real work
Step1: Backup the Your KVM server
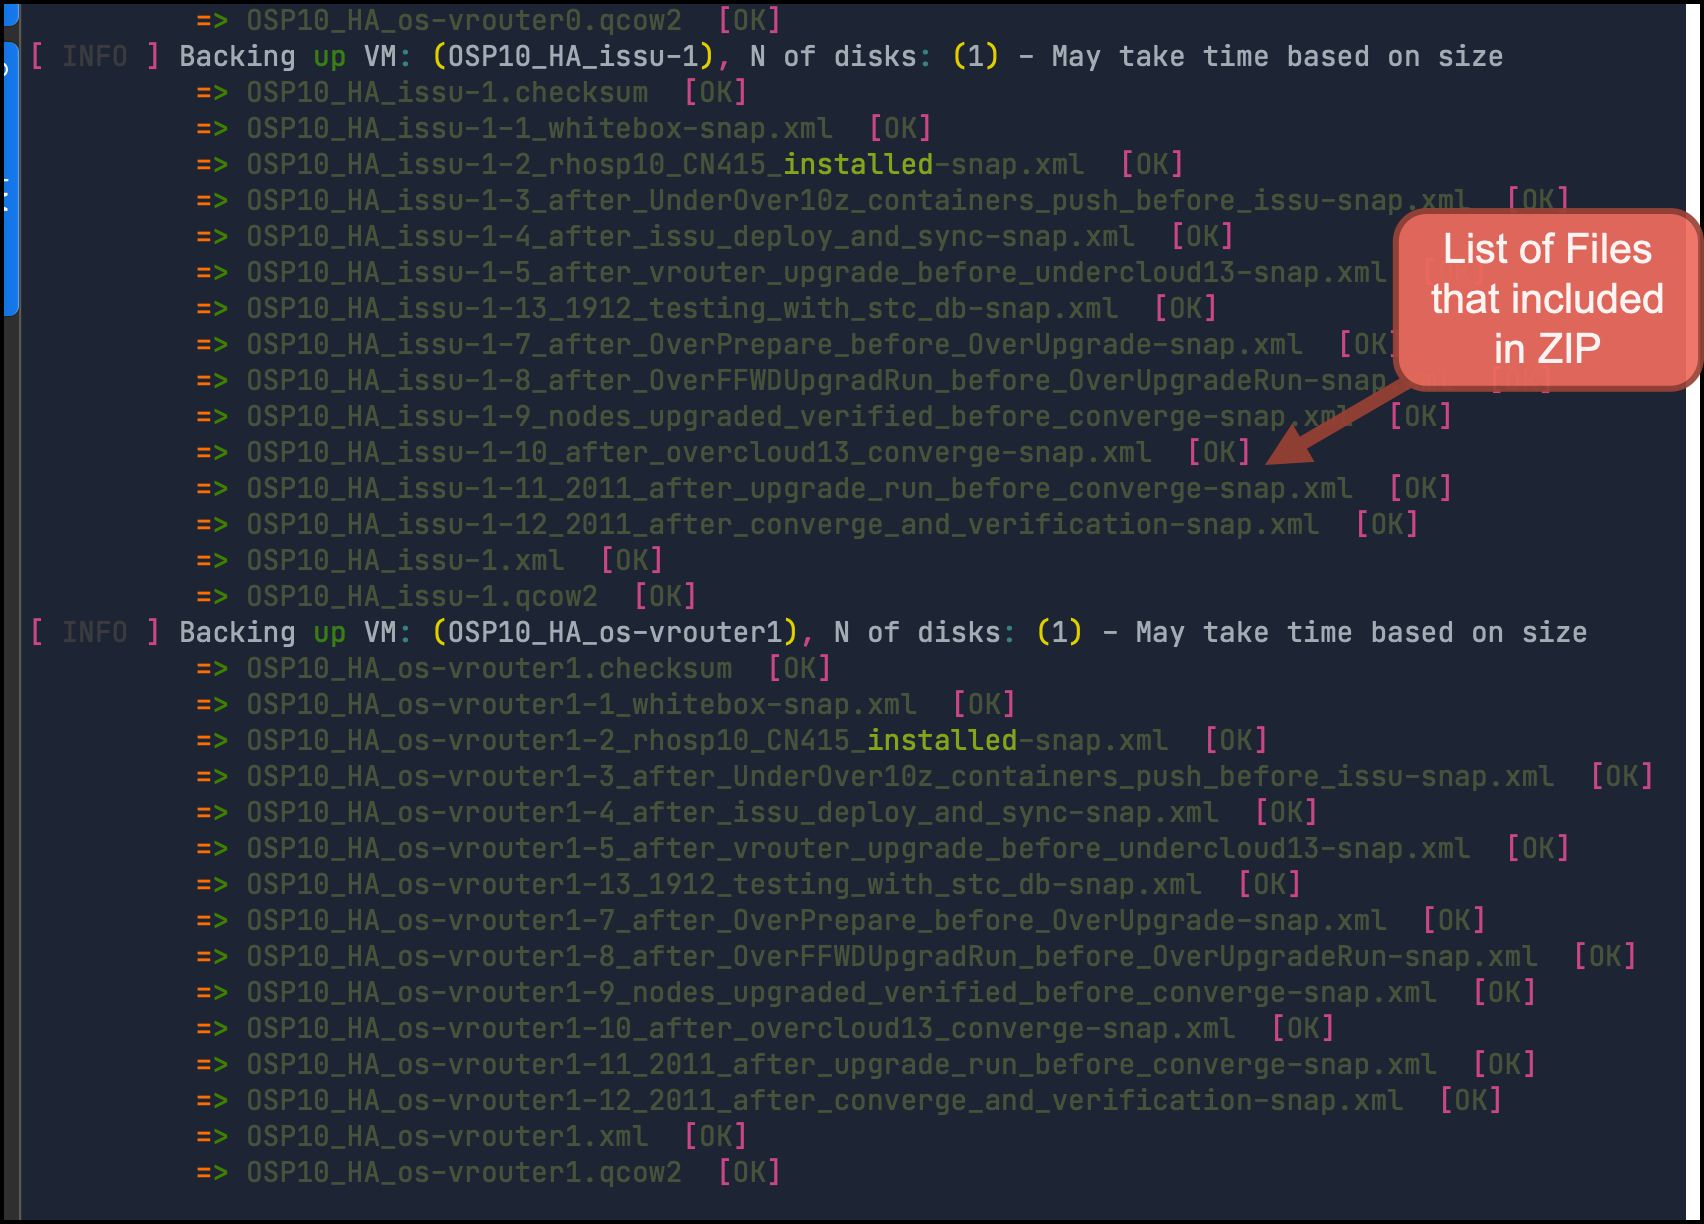
First, we need to take backup of the virtual machines and their internal snapshots alongside the domain XML. I found a good ruby tool that does that automatically Here (https://github.com/eslam-gomaa/virt-backup)
screen
for i in `virsh list --name --all | grep OSP10_`;do echo $i; \
time ruby /root/virt-backup/virt-backup.rb --backup \
 --with-snapshots \
 --original-vm $i \
 --compression default \
 --save-dir /root/test_vm_backup & done
The result will be a list of *.zip files which contain the image+snapshot+xml files. Also, you will need to backup the networks and bridges names (Actually, You will NOT need them in EVE-NG as EVE create its own bridges, but just in case you want to revert back to KVM)
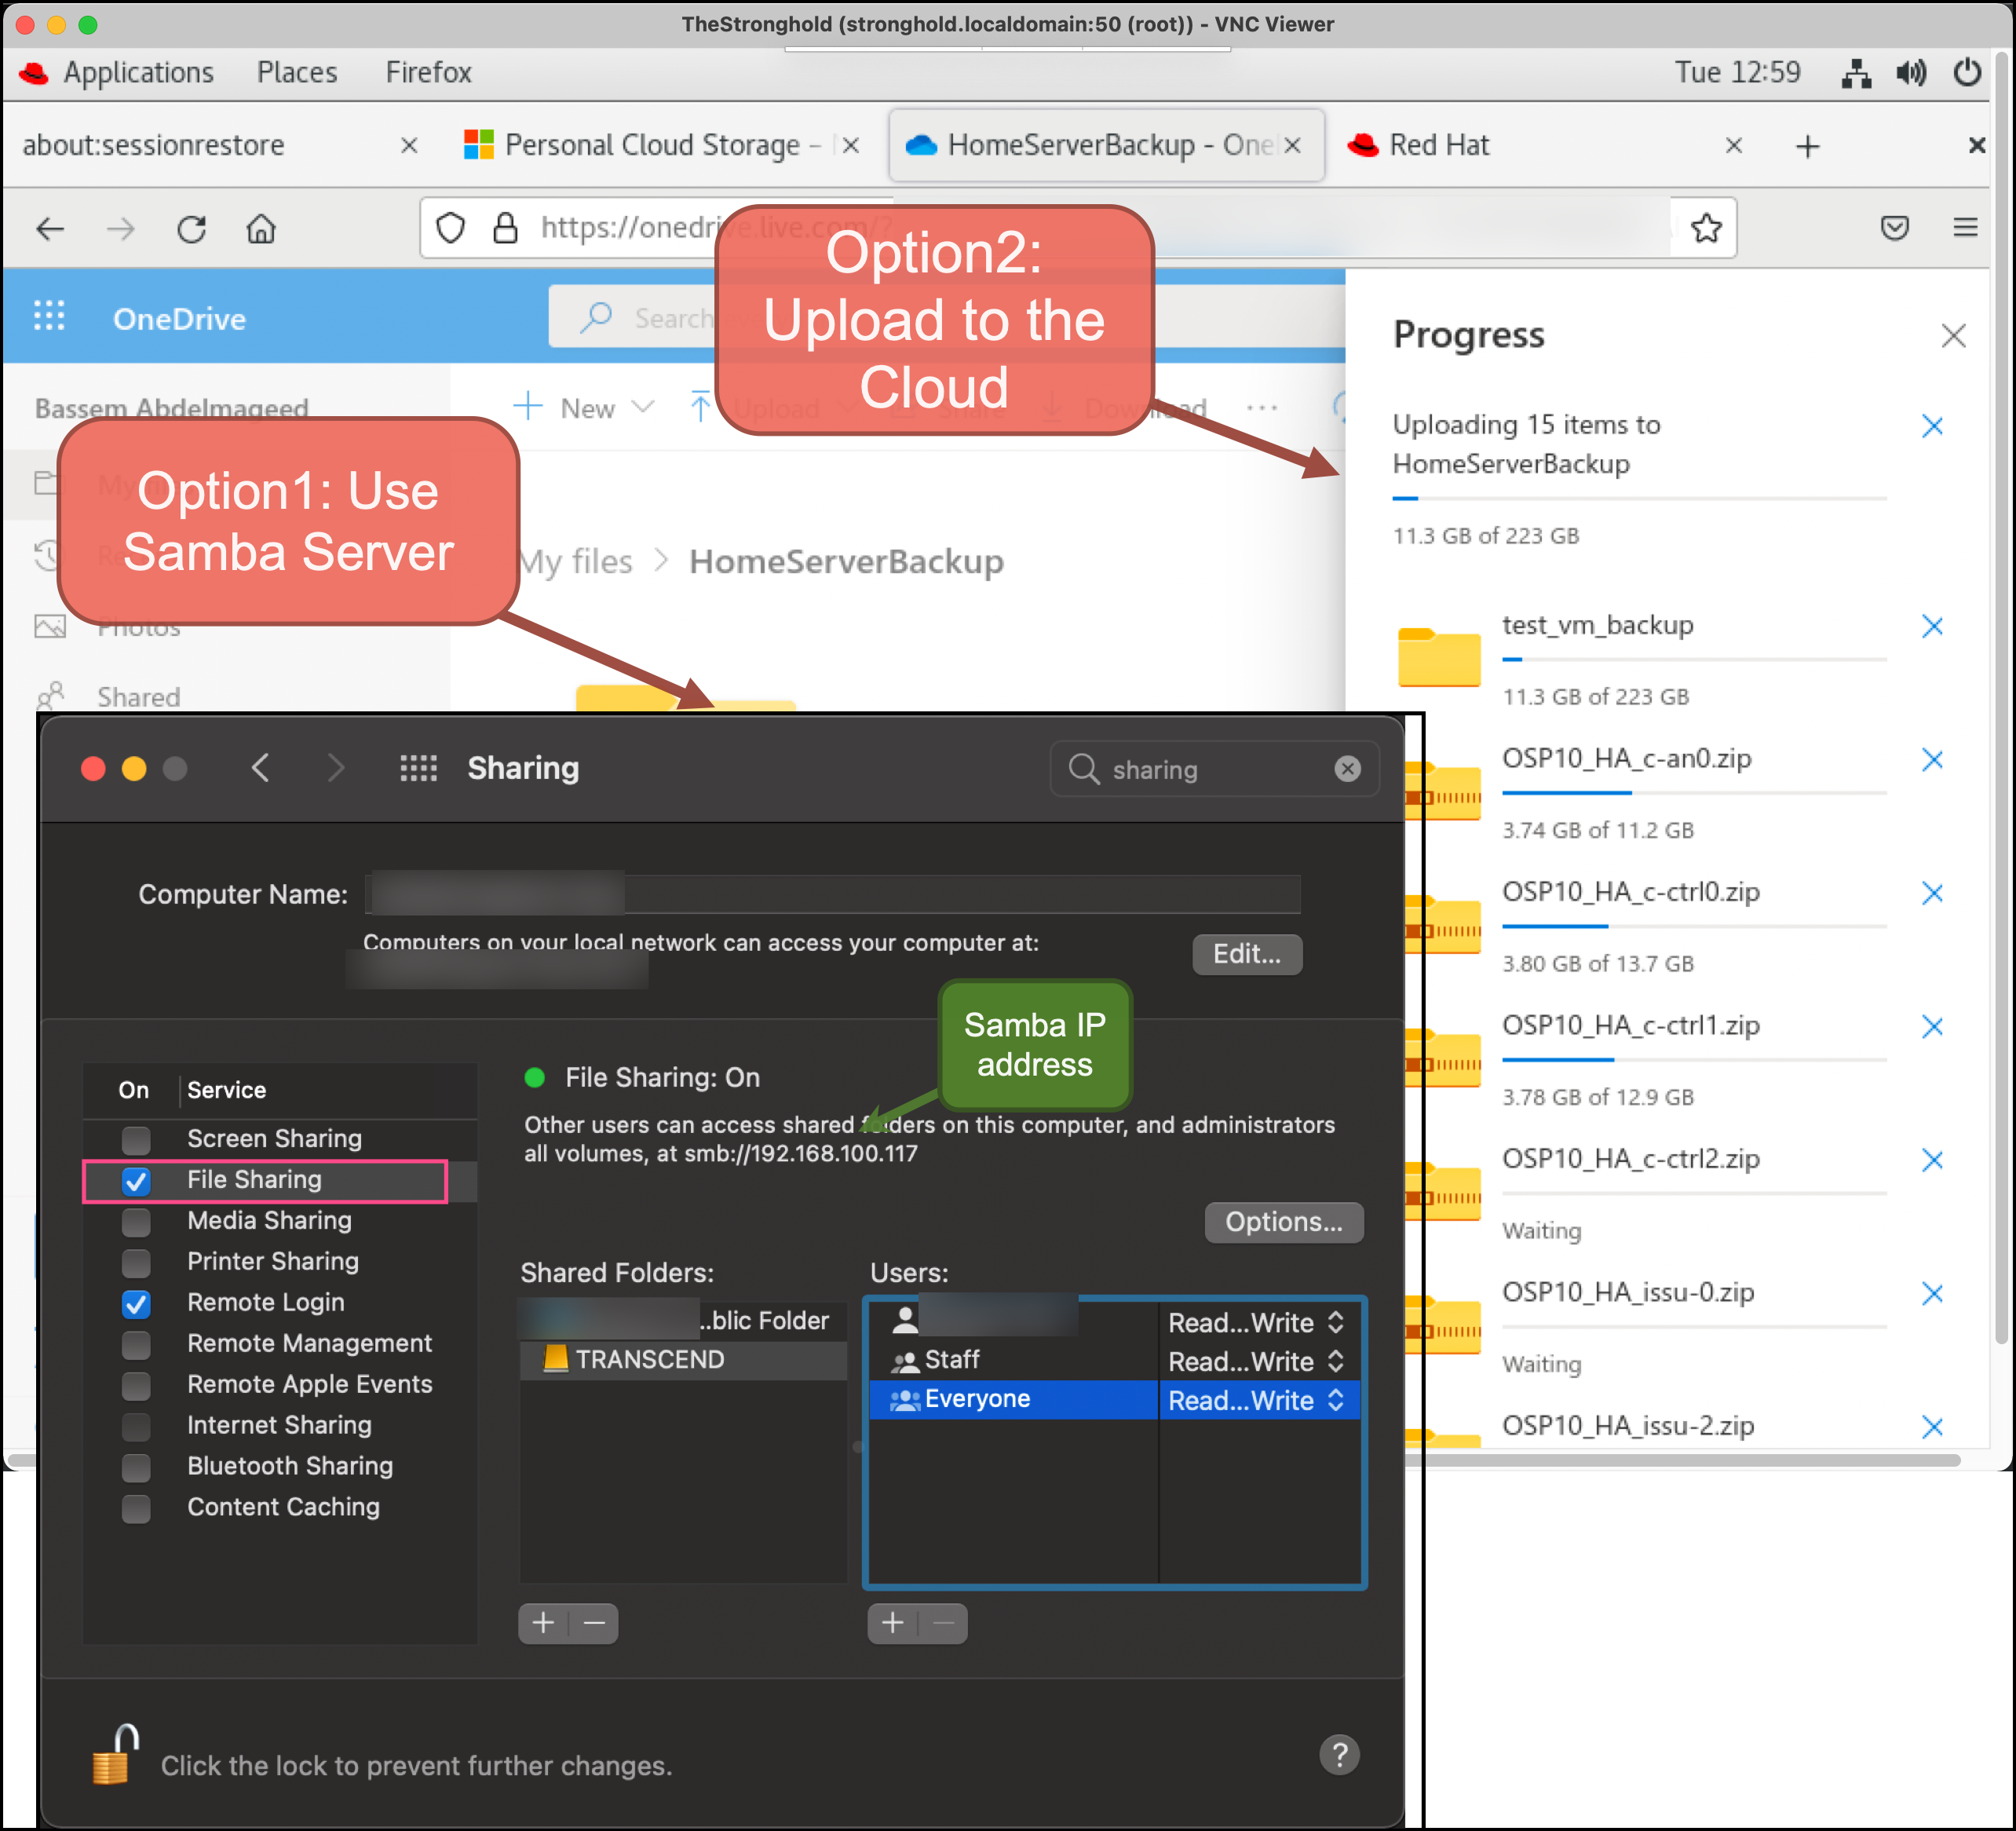
Also, you need to transfer these files to an external drive or upload them to the cloud. for me, I choose both options to avoid any loss.
Step 2: Install Ubuntu and EVE-NG
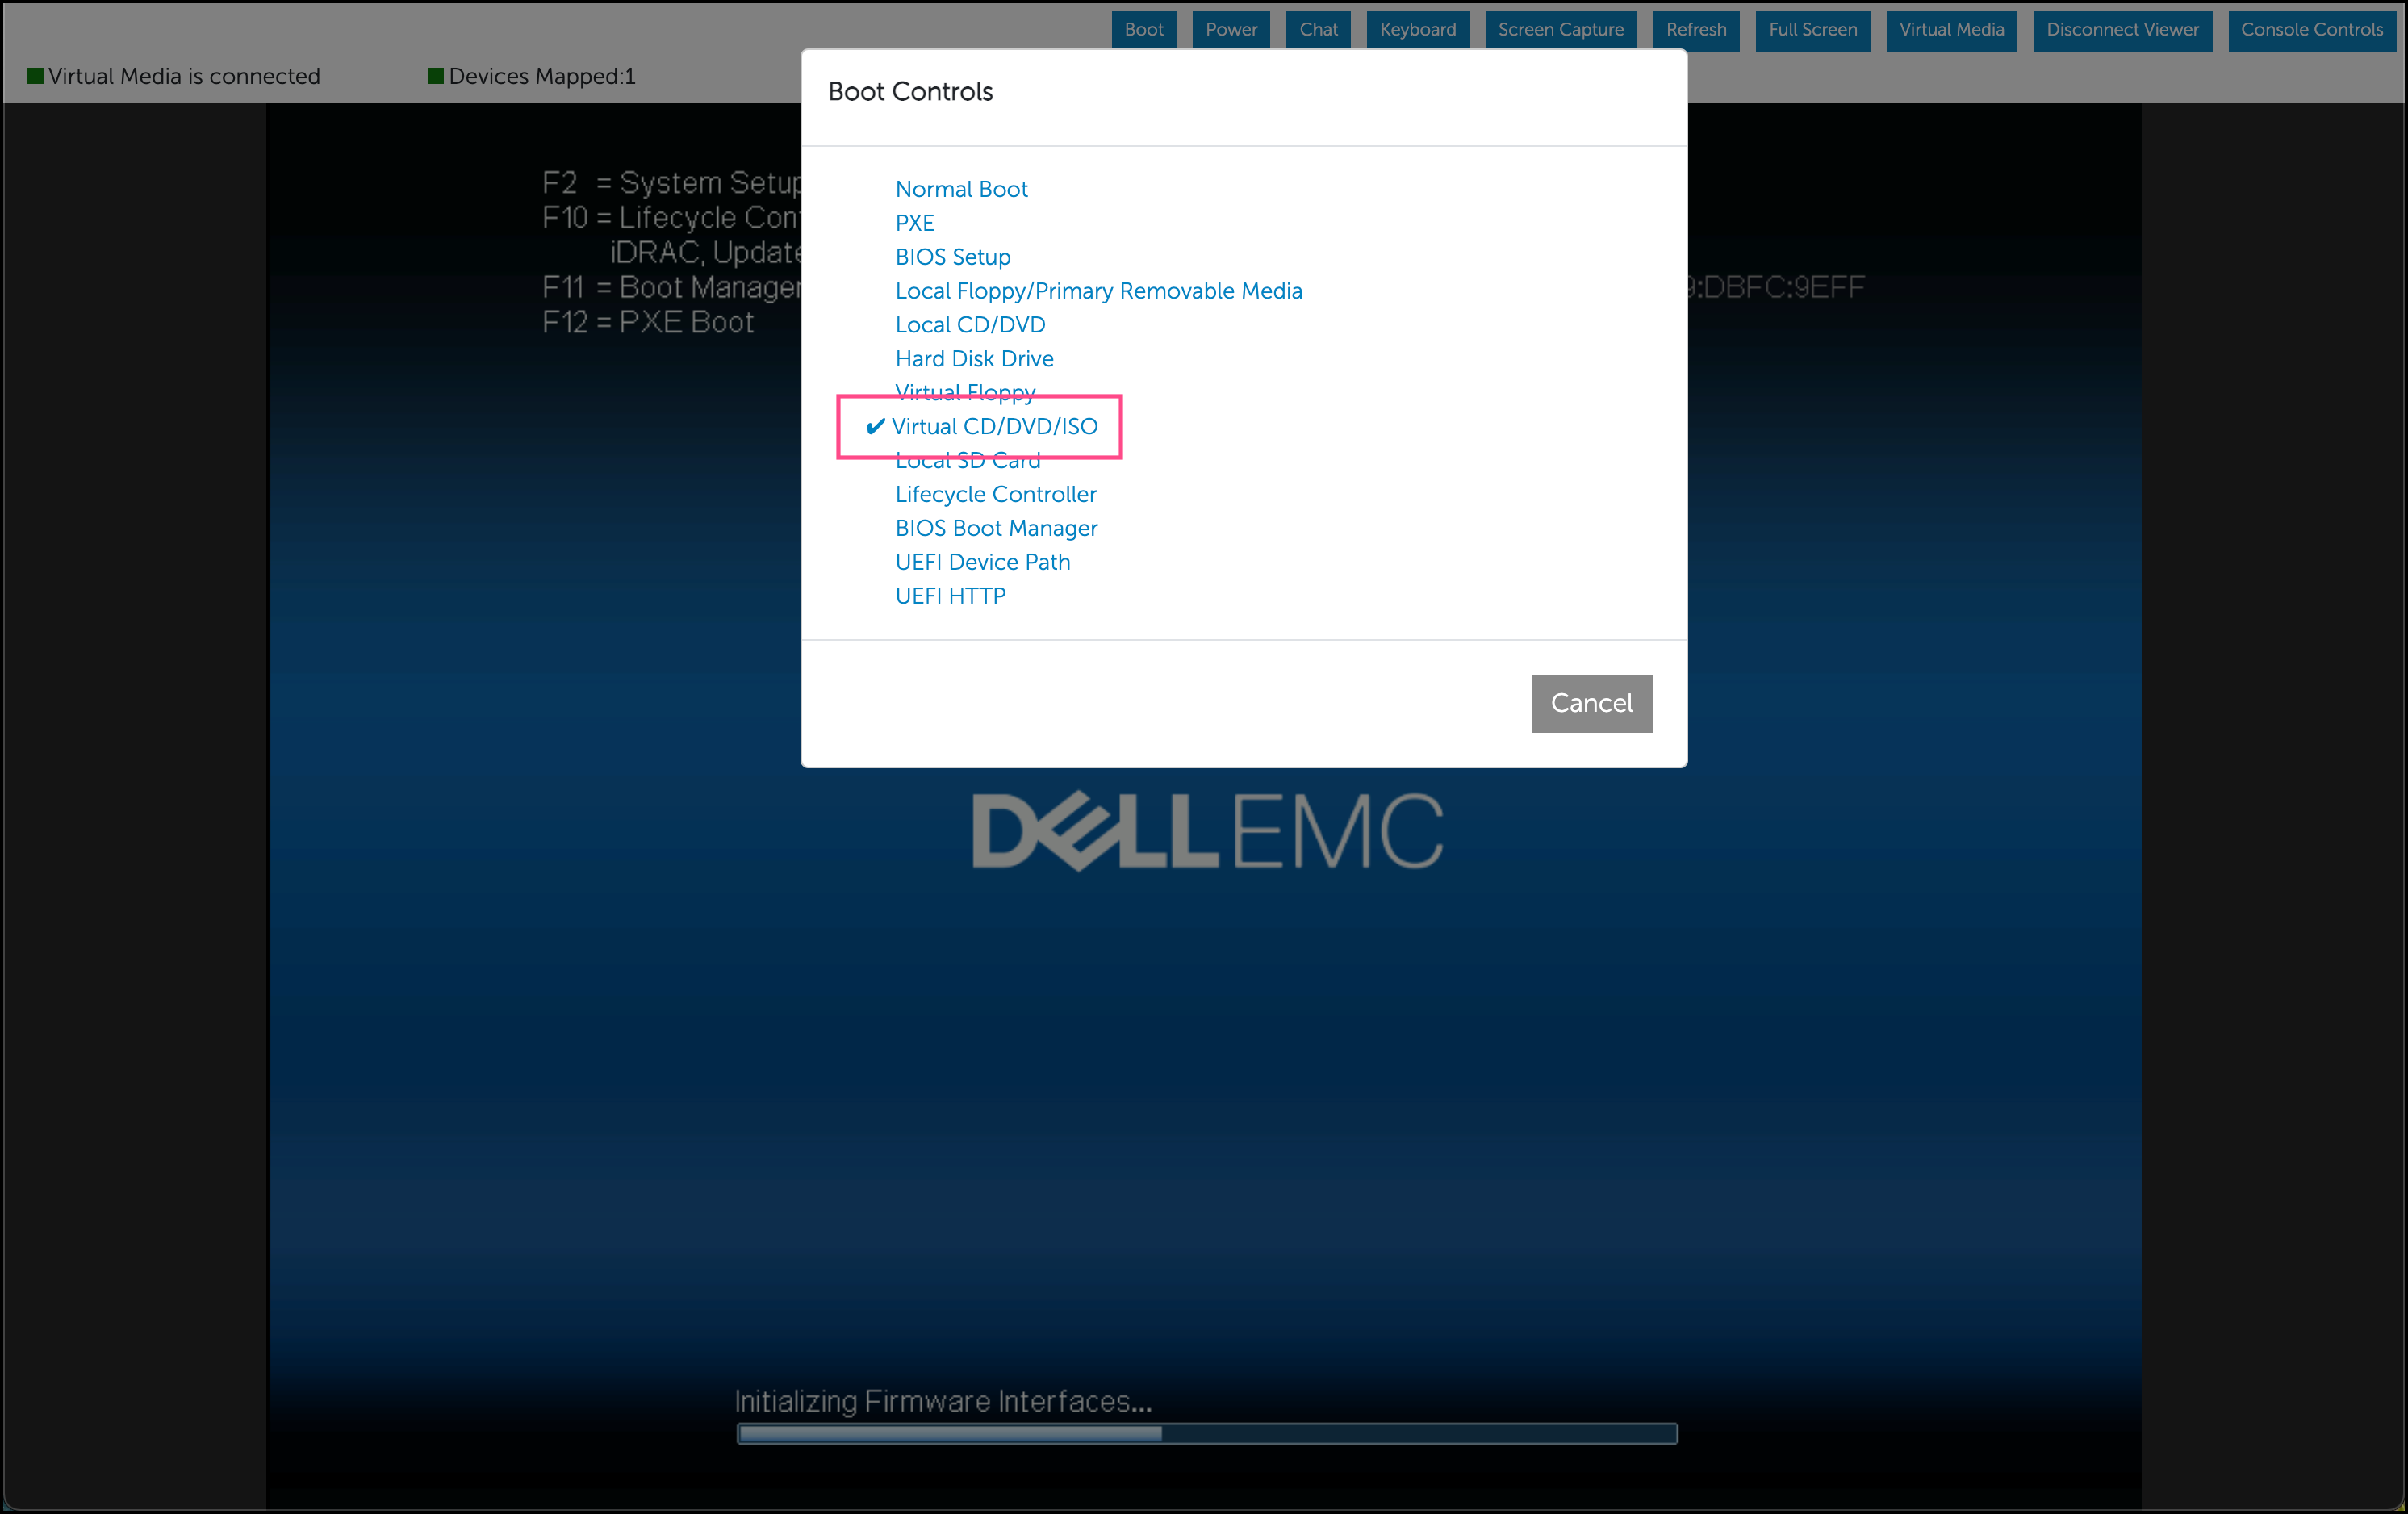
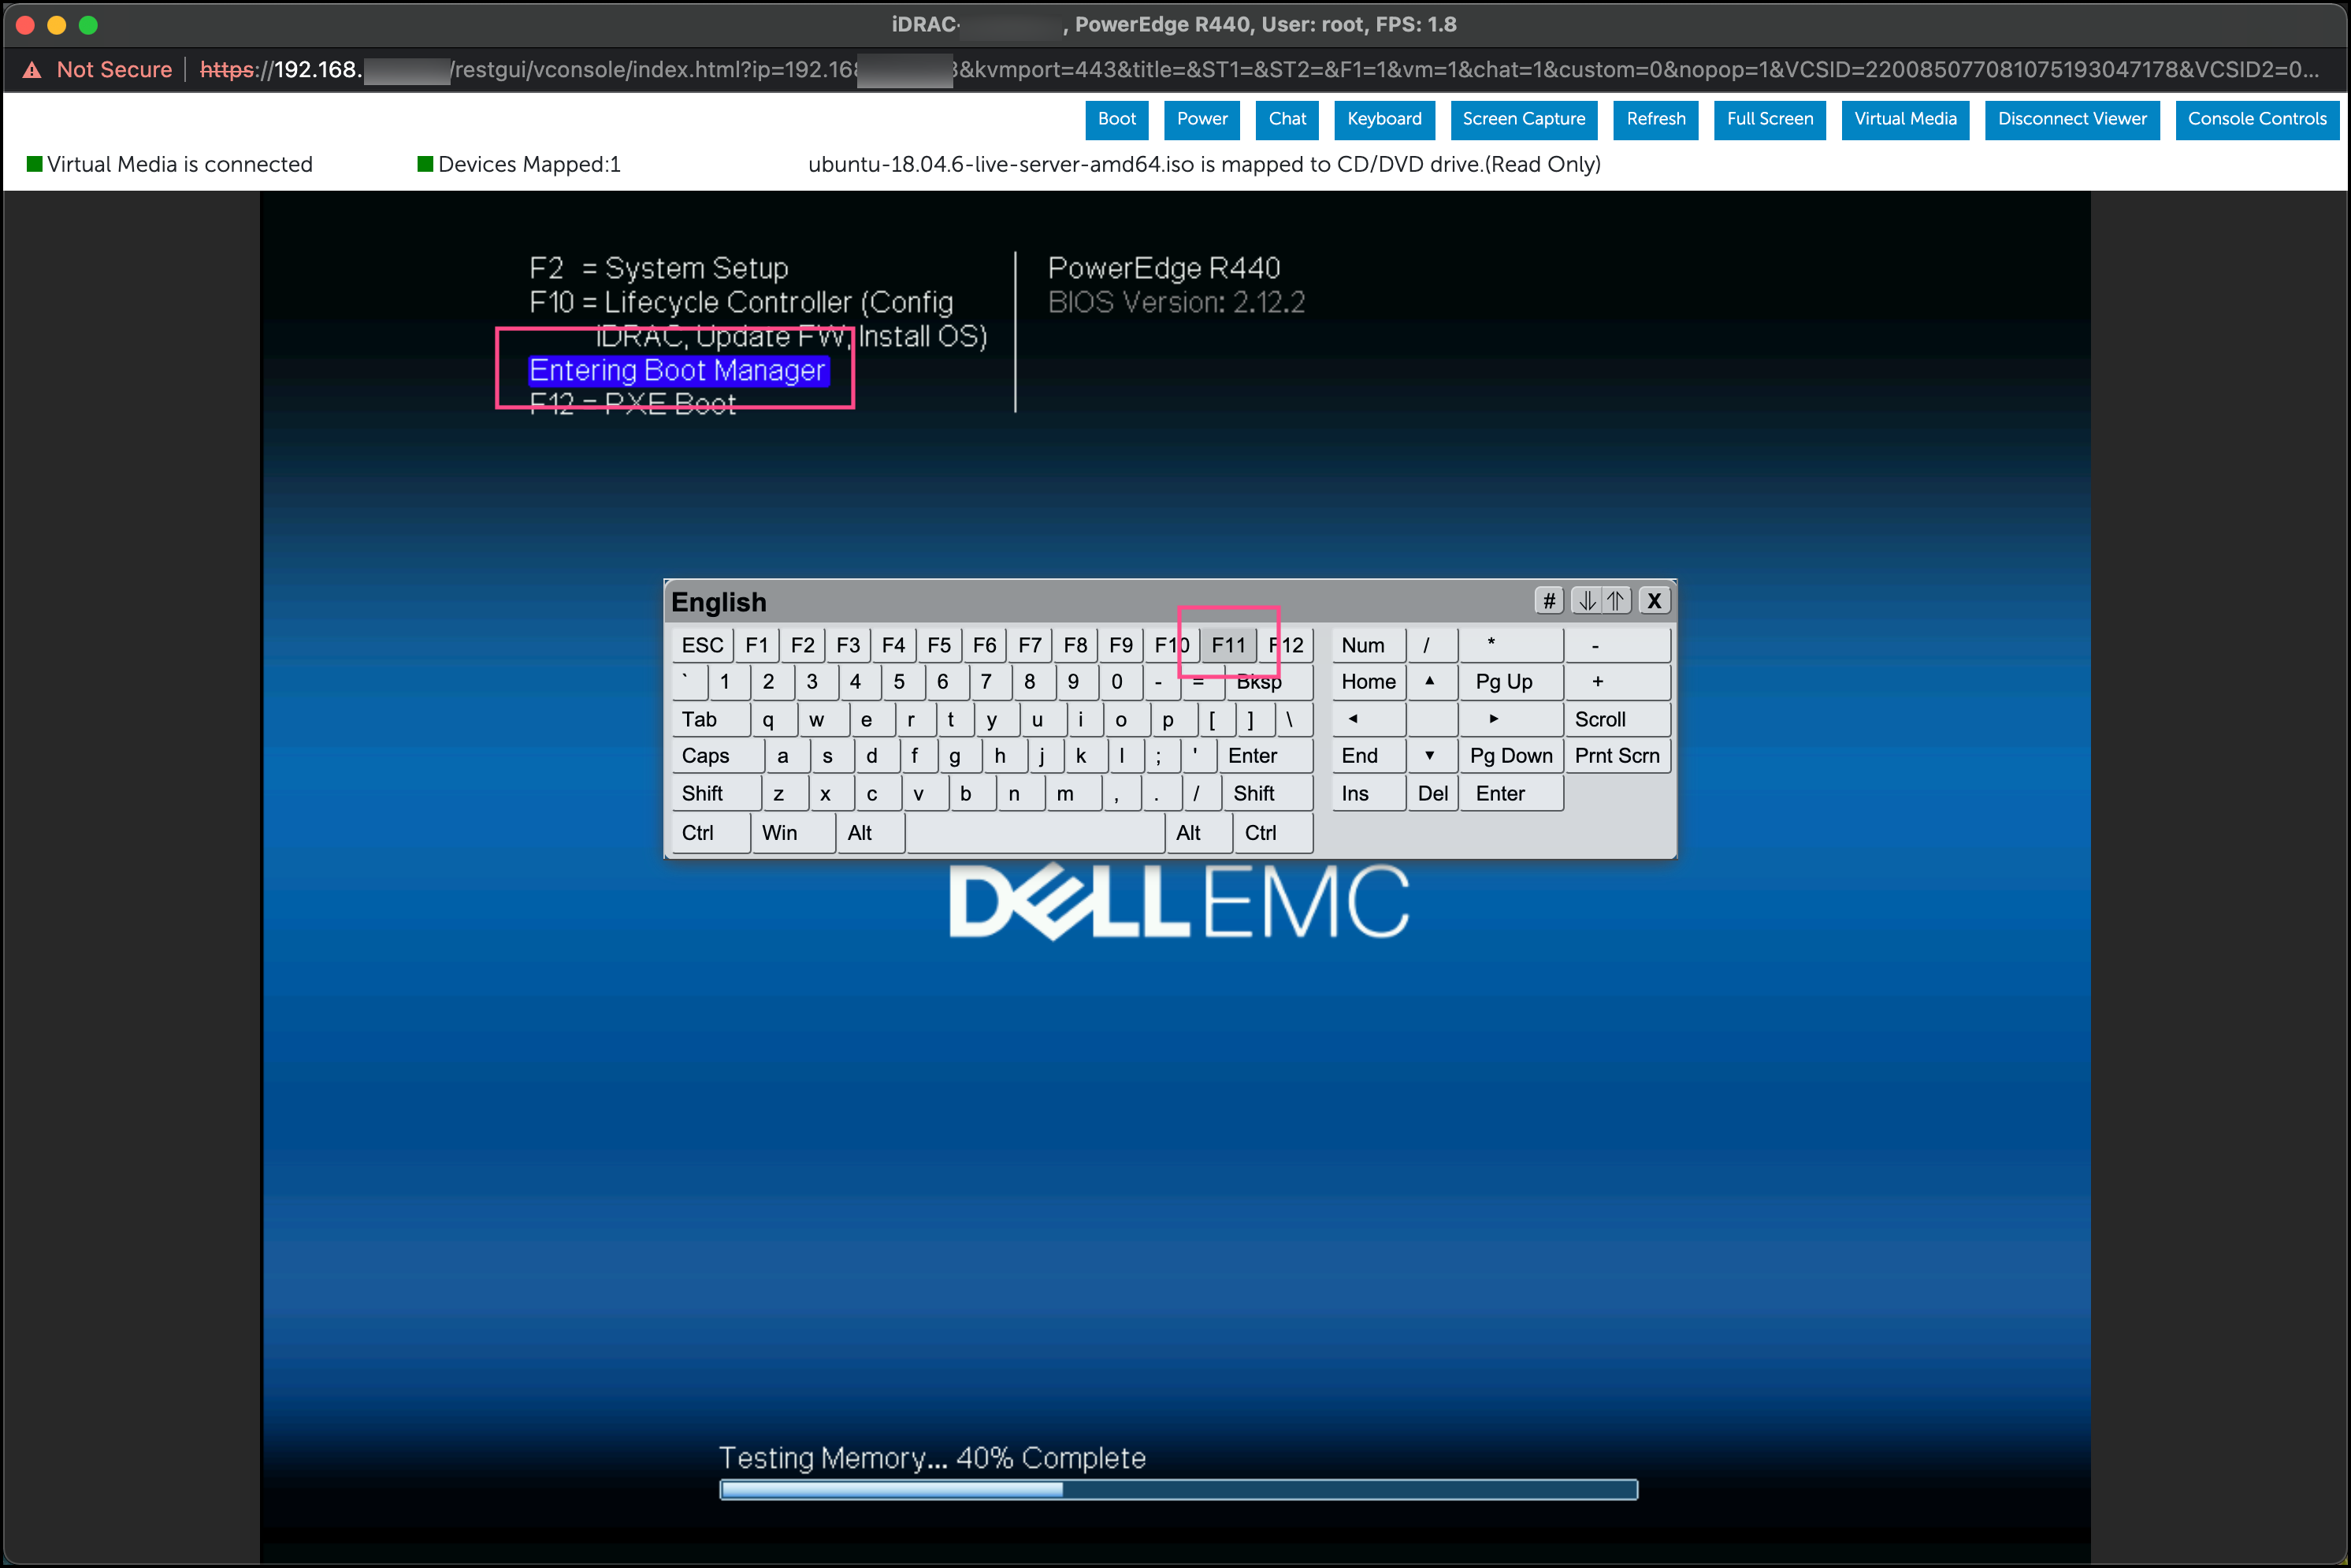
These steps are well documented in EVE-NG docs, so no need to repeat them again here. One note, if you have dell iDrac then choose to mount ubuntu over Virtual CD/DVD/ISO and then Boot from it
Finally, continue installation as normal.
The other option for installing the OS over your physical server is to burn the ubuntu iso on USB and connect it physically to the server.
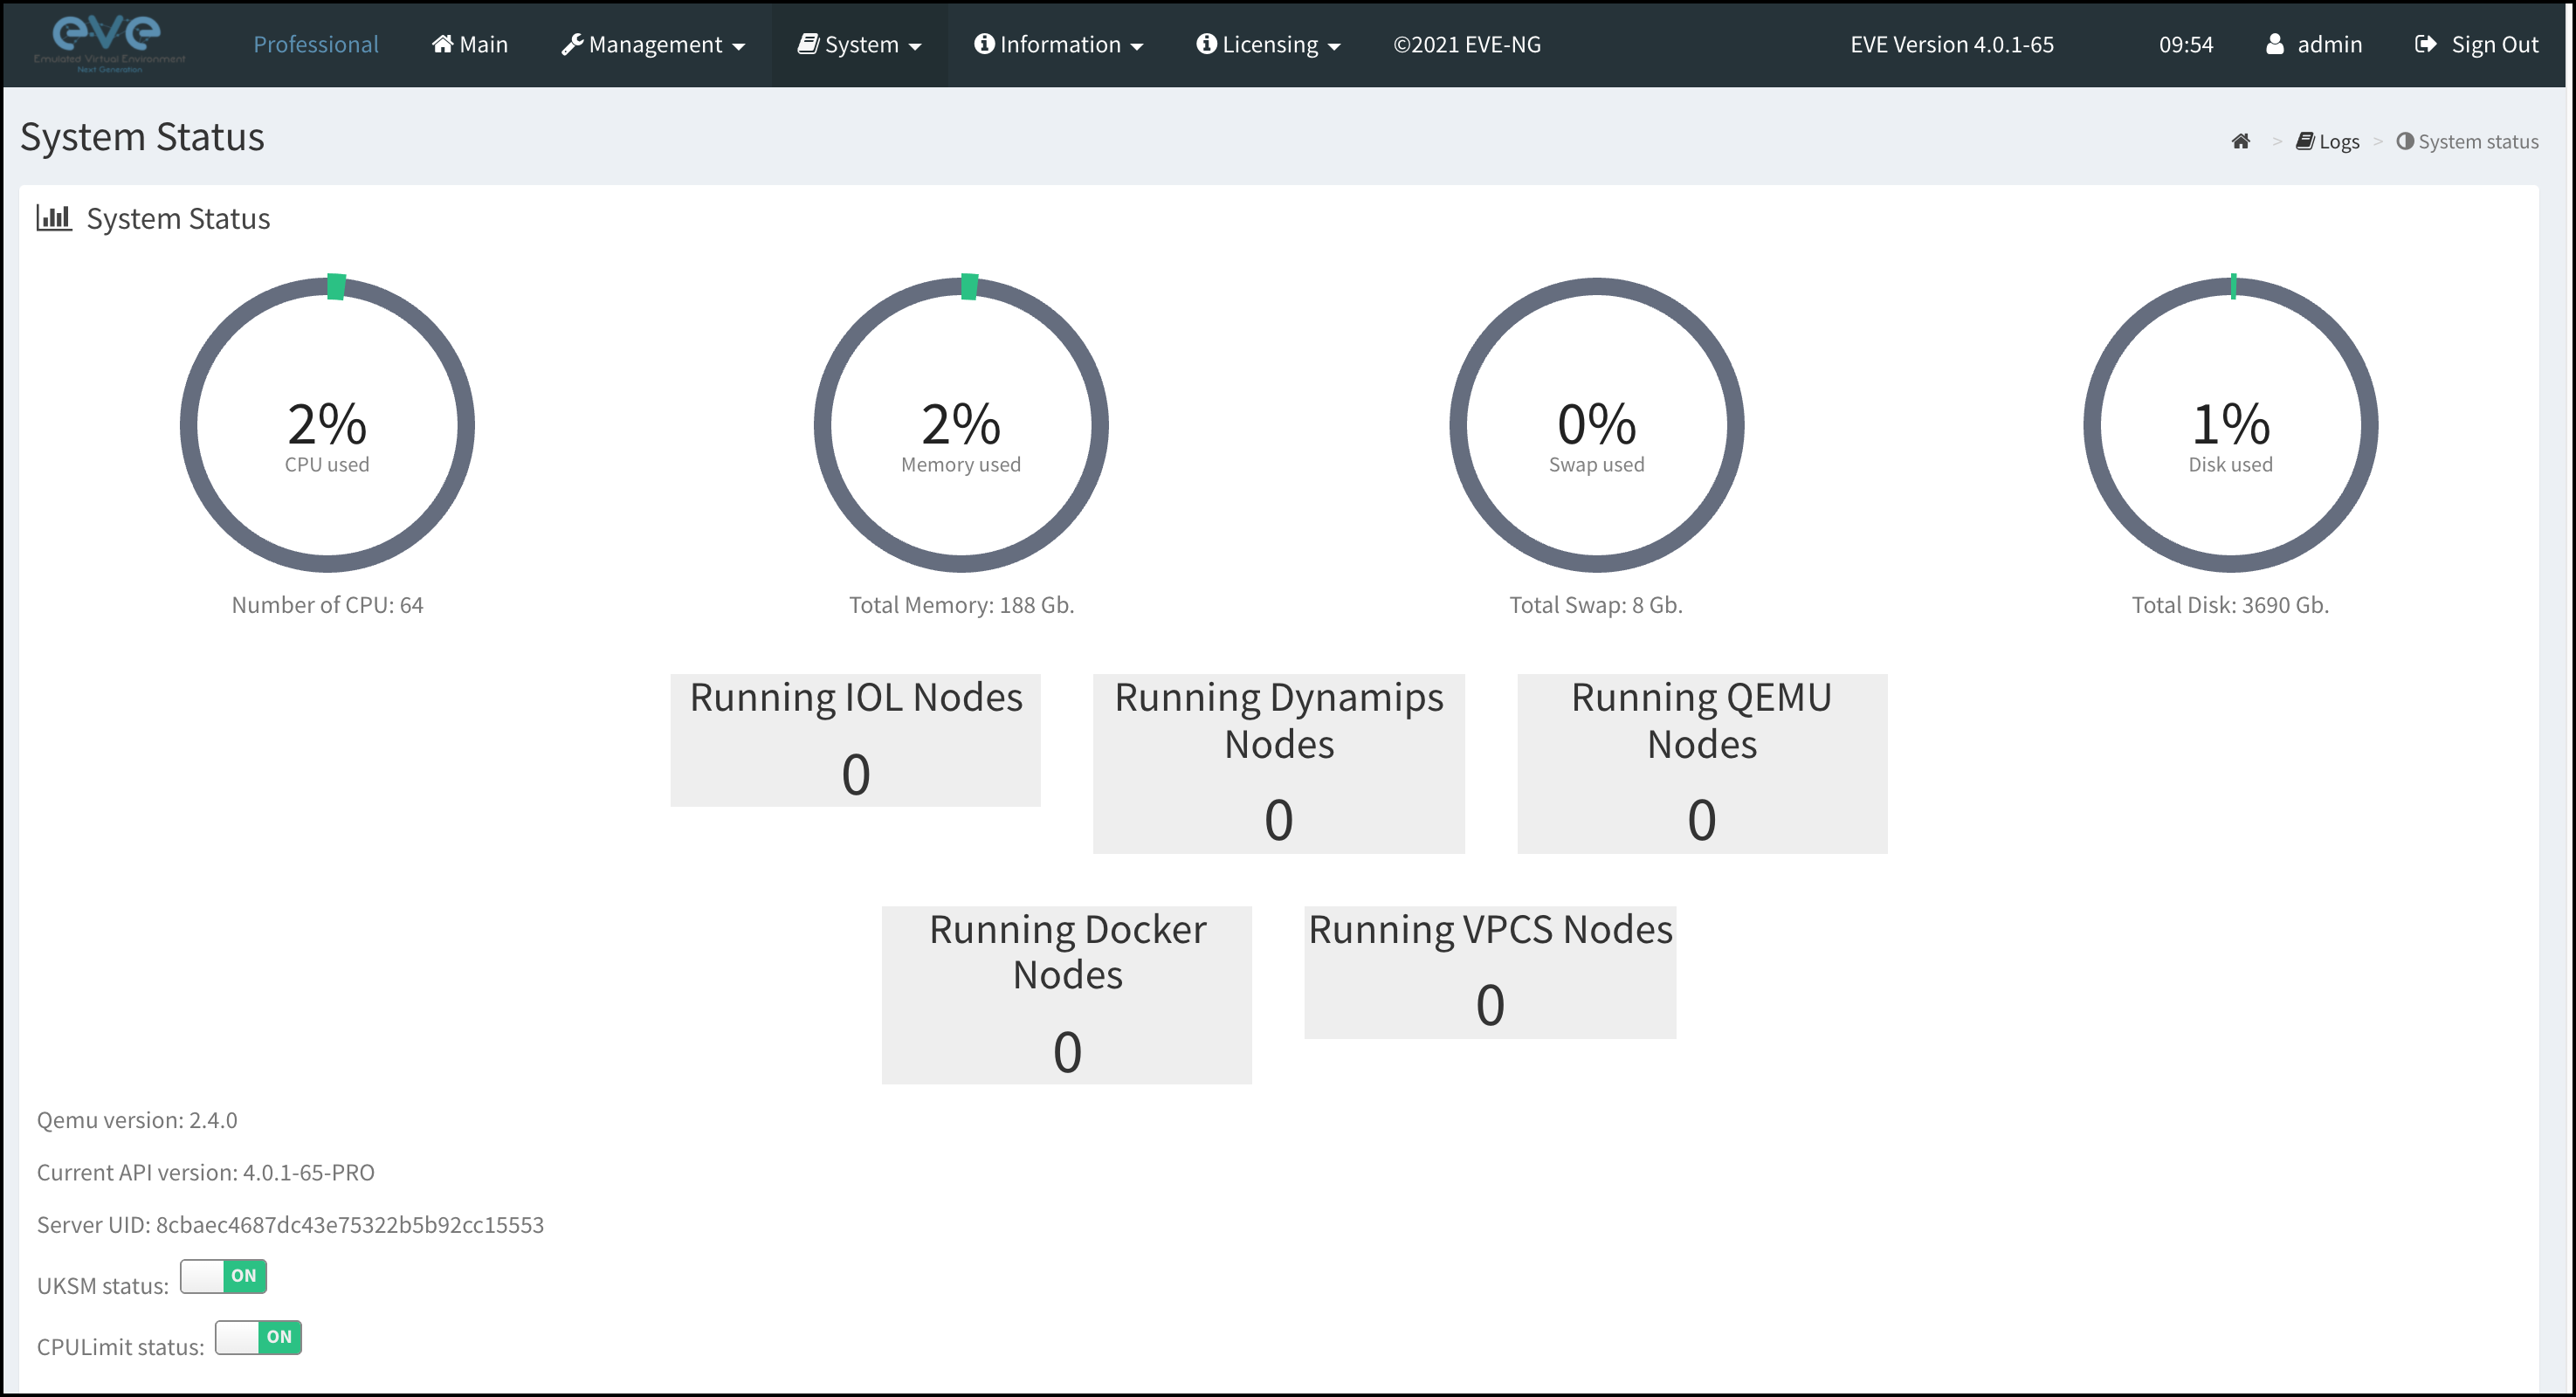
Voila!. we have now the EVE up and running and reading the specs of the server!
Step 3: Bringing back virsh-tools (Optional)
This step is completely optional. The EVE-NG is not coming with virsh as we discussed above. However, you can bring it back to ubuntu and start using it normally. this is useful if you have some network vendor docs that onboard their VMs using virsh and you want to stick with it (till you figure out how to do it in EVE)
# install clients
sudo apt-get install qemu-kvm libvirt-bin ubuntu-vm-builder bridge-utils
sudo apt-get install libvirt-bin # for Ubuntu 16, check Ubuntu 18
sudo apt-get install virt-manager libvirt-clients
# Adjust the permission for libvirt user
sudo adduser `id -un` libvirt
vim /etc/libvirt/qemu.conf  # uncomment: user=root/group=root
sudo chown root:libvirt /dev/kvm
# Probe the KVM module
modprobe -r kvm_intel
modprobe kvm_intel nested=1
cat << 'EOF' > /etc/modprobe.d/kvm.conf
    options kvm_intel nested=1
EOF
cat /sys/module/kvm_intel/parameters/nested
# Reboot
reboot -f
# Create the storage pool
virsh pool-define-as --name default --type dir --target /root/vm_images
virsh pool-autostart default
virsh pool-start default
virsh pool-list
virsh pool-info default
You can quickly install a virtual machine to test the setup but beware, it won’t be visible in EVE topology and eve doesn’t know anything about it!. However, you can still ping between it and nodes inside the EVE topology by sharing the Linux bridge ( and YES, Linux bridges now supports now layer 2 protocols such as LLDP and LACP 🎉)
Step 4: Build lab diagram and power it on
We need now to build the networking between our nodes but this time we will use the nice UI in the EVE.
Start by creating a new lab in EVE then add bridges to the canvas. in my case, I have Red Hat Openstack setup with Juniper Contrail which requires 7 main internal networks (+ Internet) as below

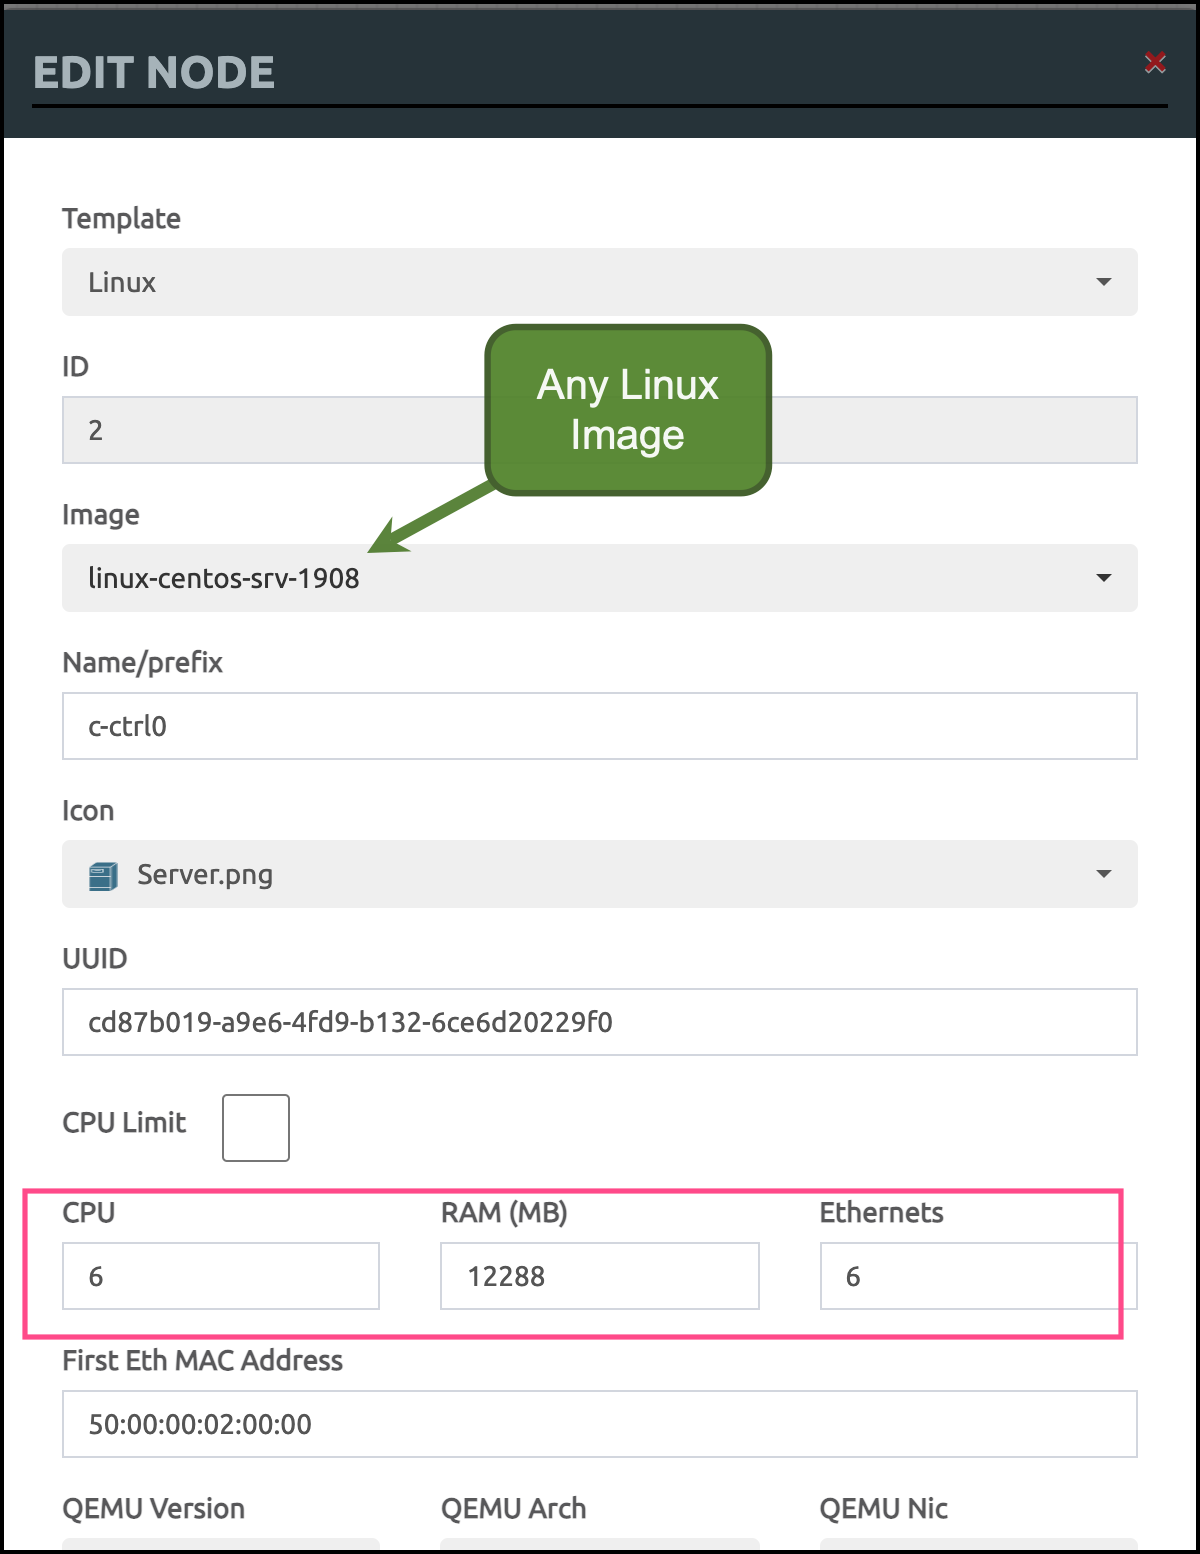
then start to add any Linux node, really any Linux node should be enough! as we need the EVE-NG to create a dummy disk.
Don’t forget though to specify the CPU/Memory/Ethernet
and finally, connect the nodes with each other. This is the final look
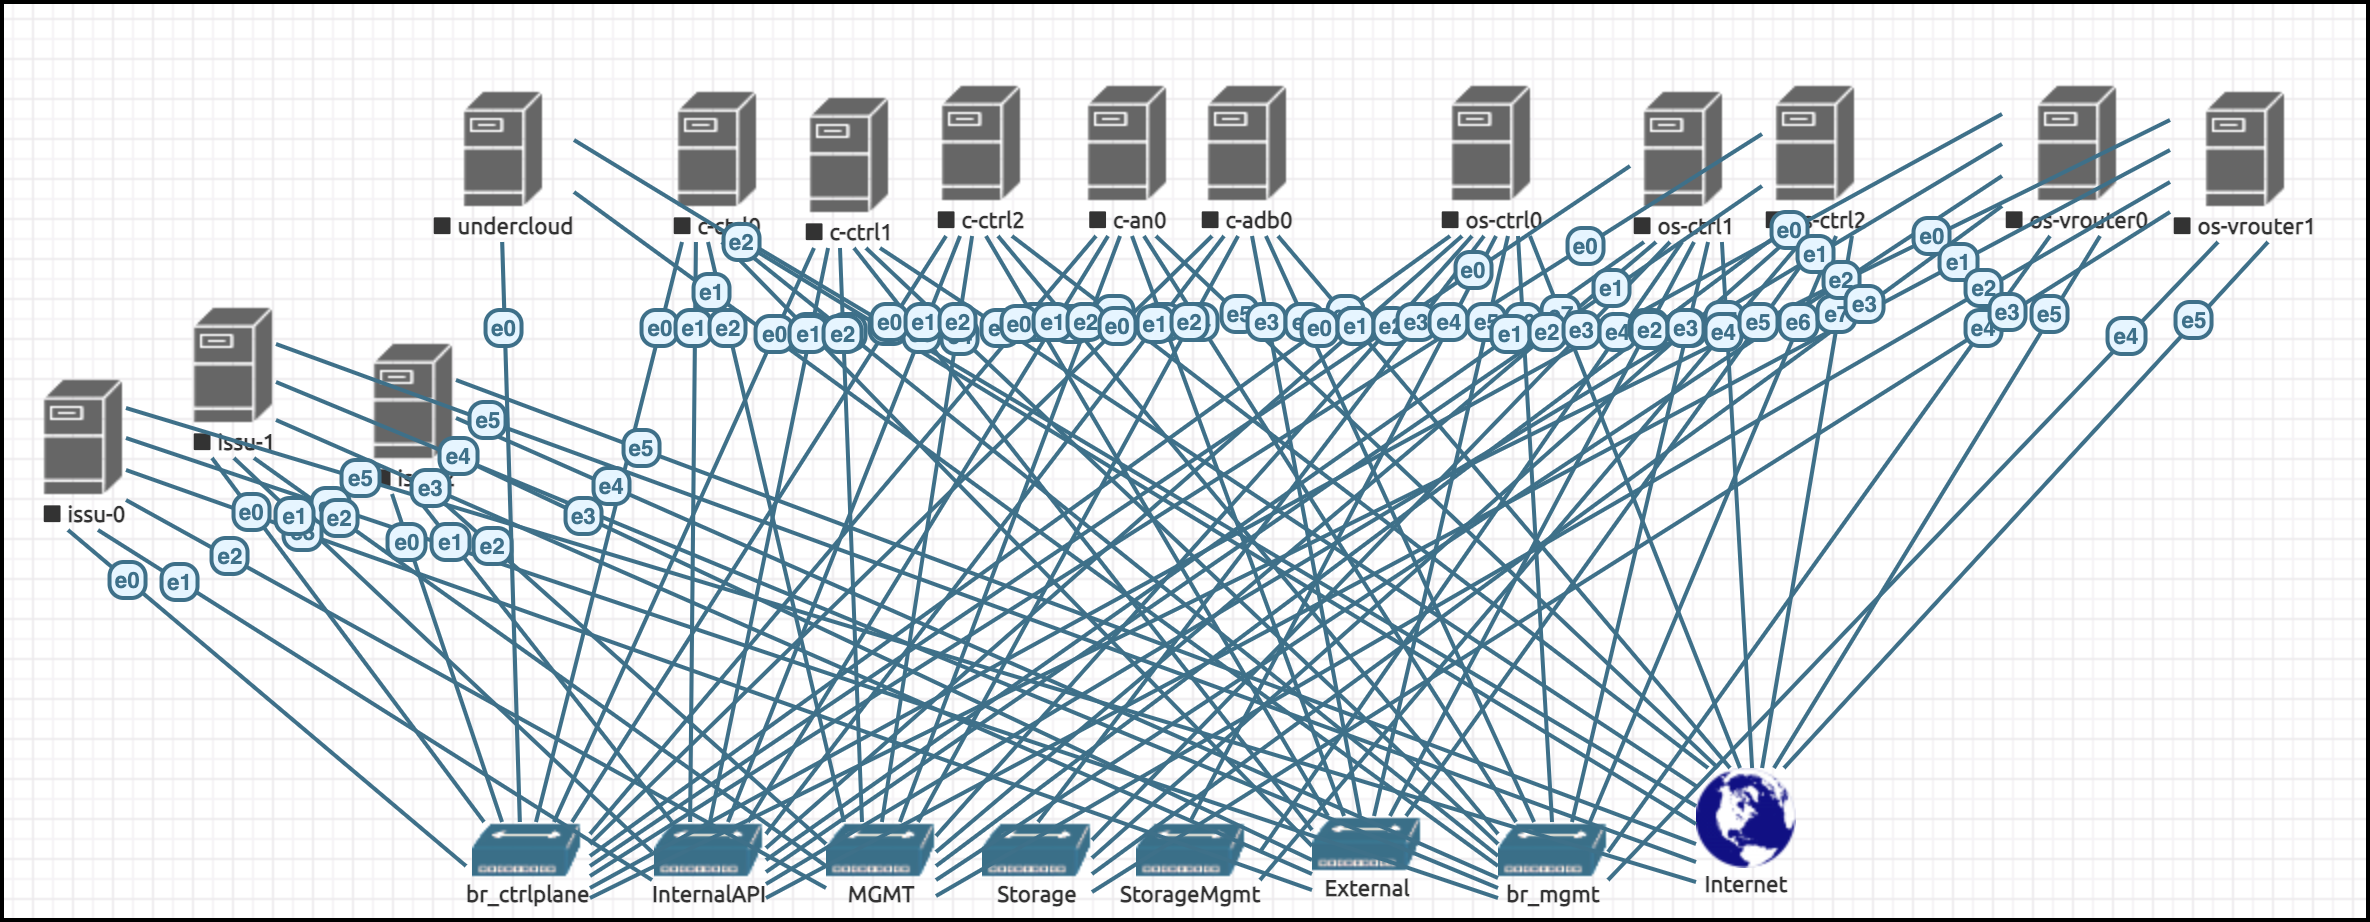
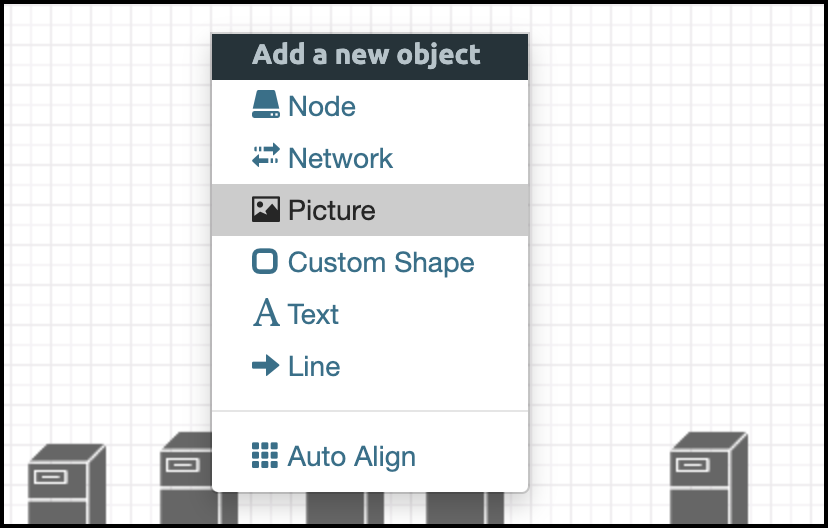
Wow, This is really ugly! No worries. EVE-NG came with a nice feature called custom topology where you can hide all of these behind a nice Visio or PowerPoint diagram. just right click on the canvas and upload your topology image
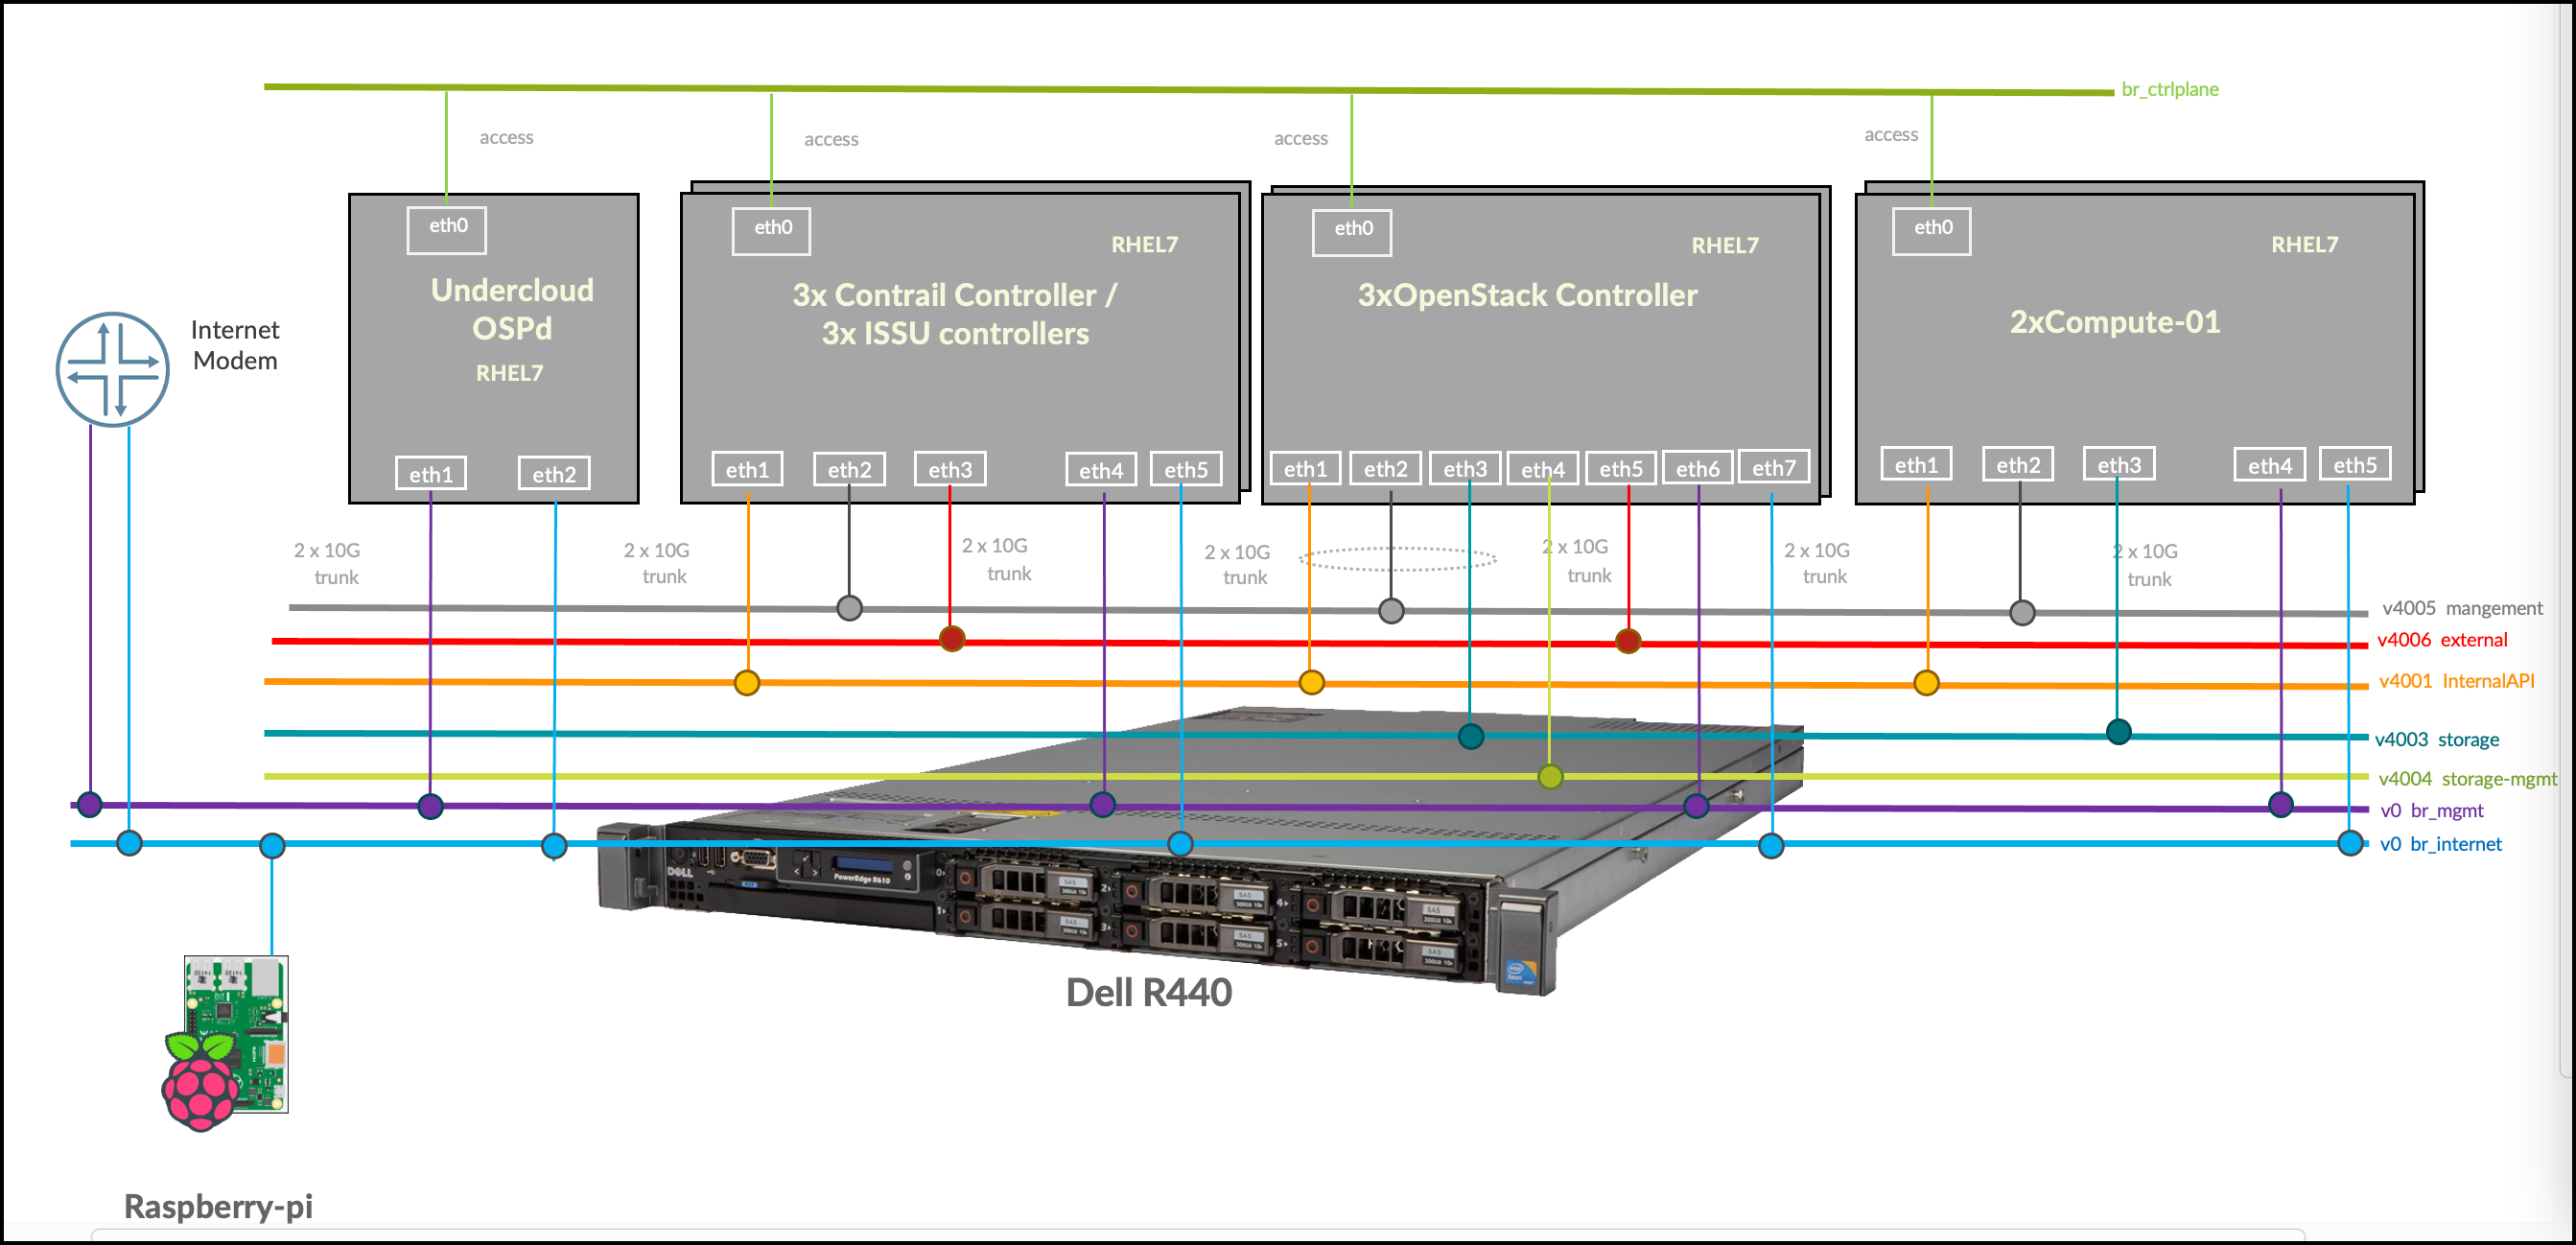
Then you can make each one of them is clickable (i.e. when you click on a specific node on your image topology, it will open the corresponding node) – this is much better looking when presenting it during customer presentations or in TOI sessions.
Step 5: Restore your QCOW2 images
let’s now restore the KVM images into the EVE.
First, you need to power on the VMs for a couple of seconds then shut them down. this will make EVE create each node under the lab folder
inside each folder, you will find virtioa.qcow2 which represent the dummy disk which we created before.
$ ls 1/virtioa.qcow2 -htlr
-rw-rw-r-- 1 root unl 195G Feb  2 08:15 1/virtioa.qcow2
Now you need to copy the qcow2 files (that we backed up before from your KVM setup) to each corresponding folder under the EVE lab
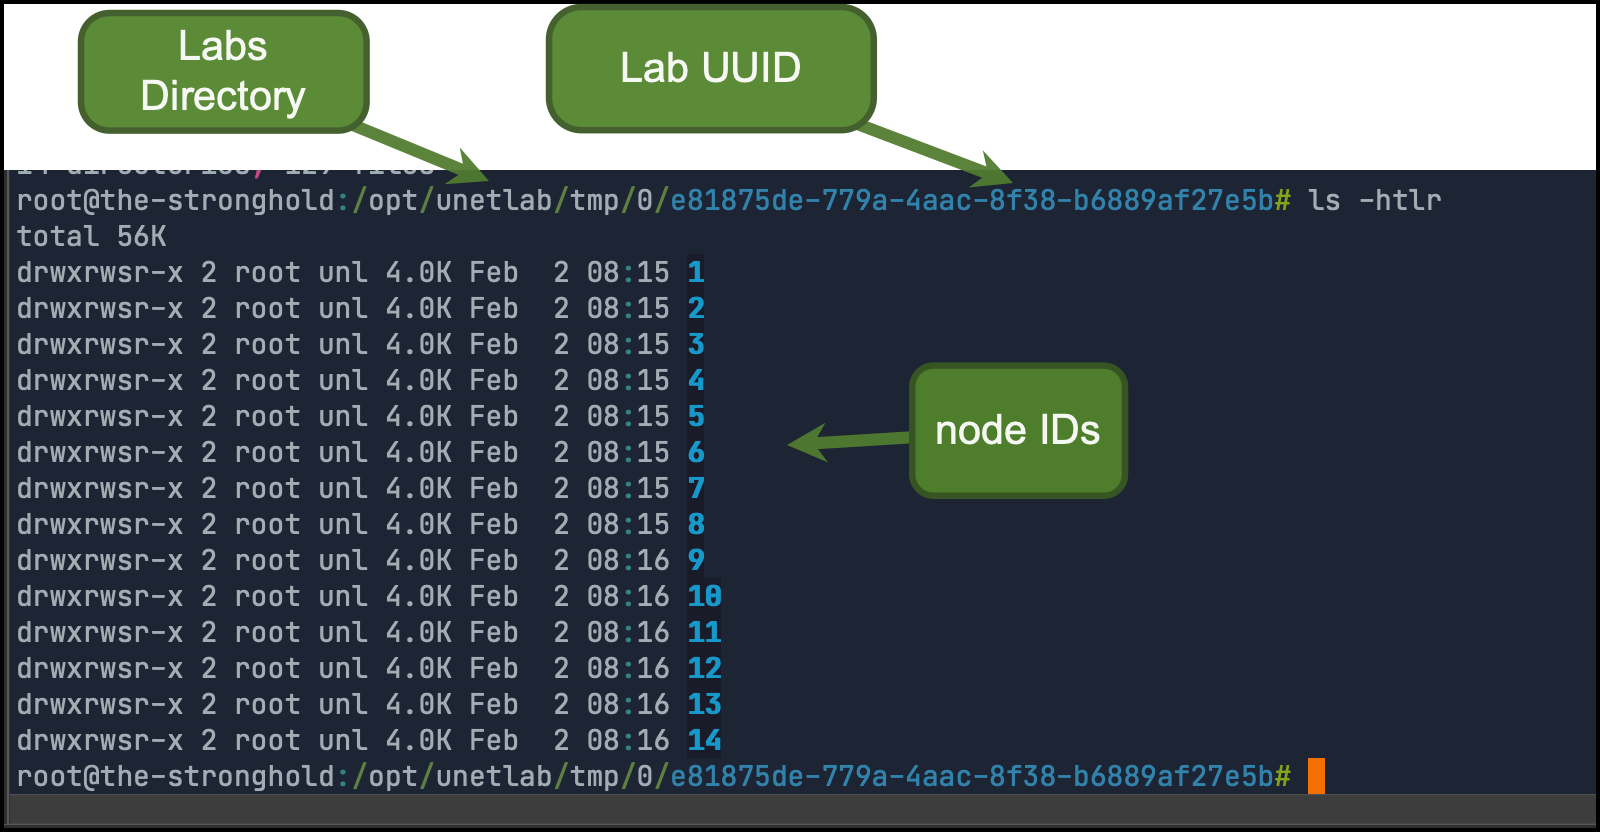
but how to know which file should be copied to which node id? there’s two options
Option1: Right-click on the node and you can find the ID which maps to the folder under the eve
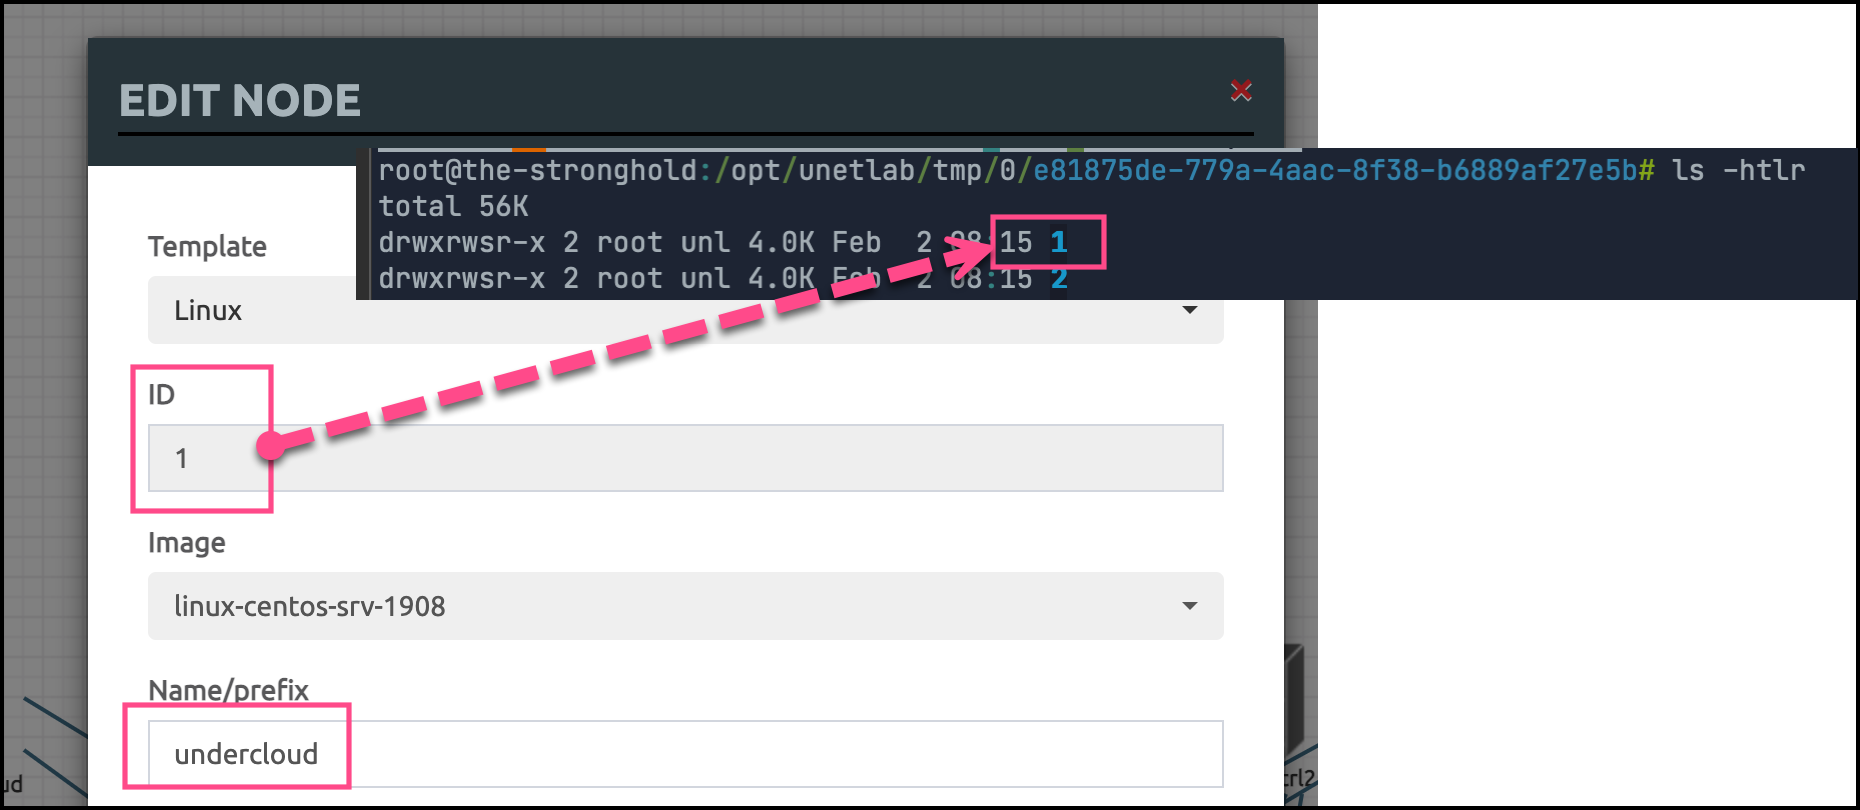
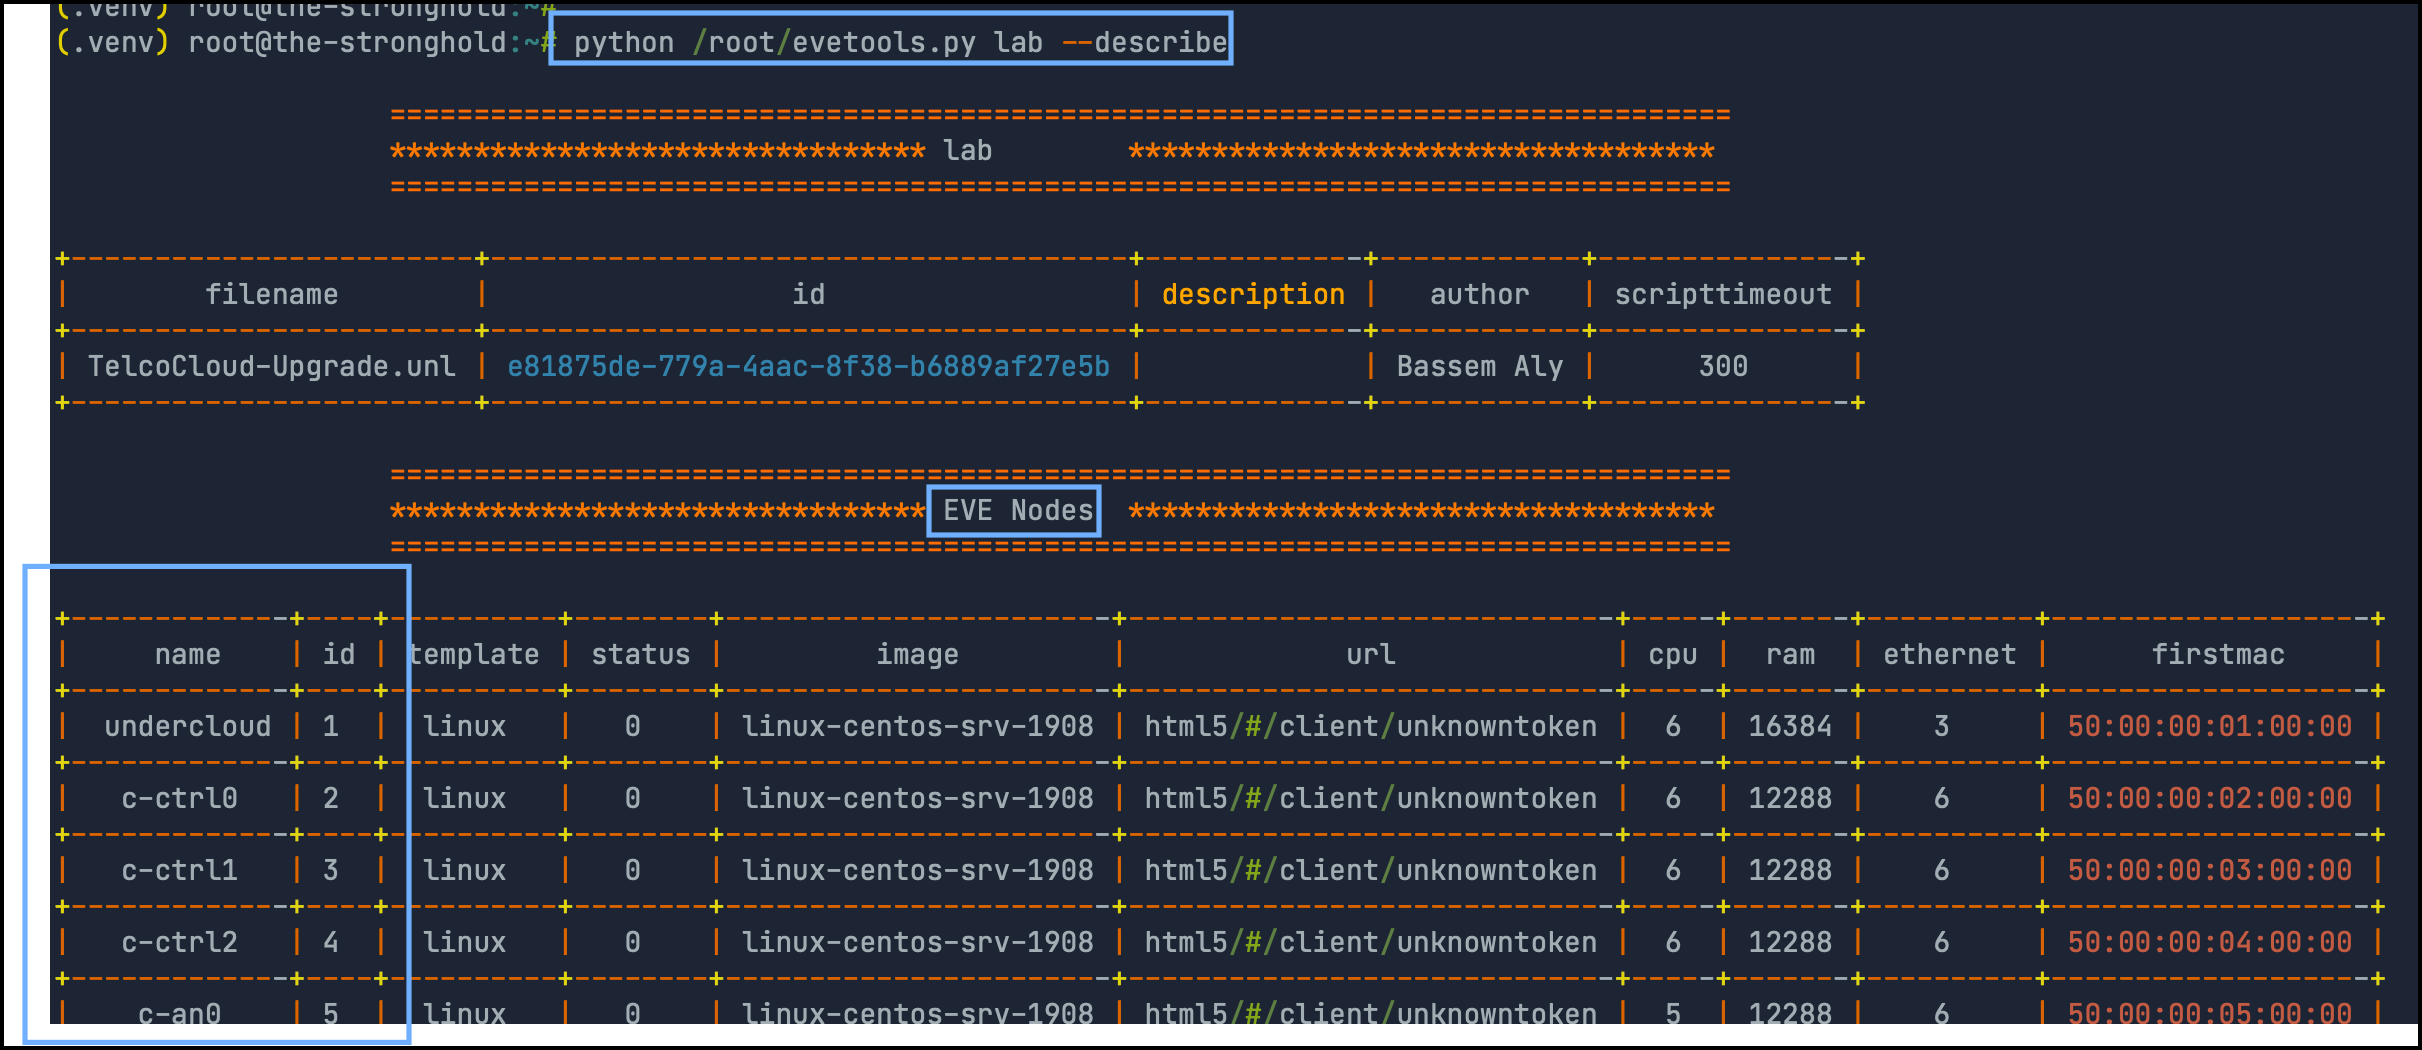
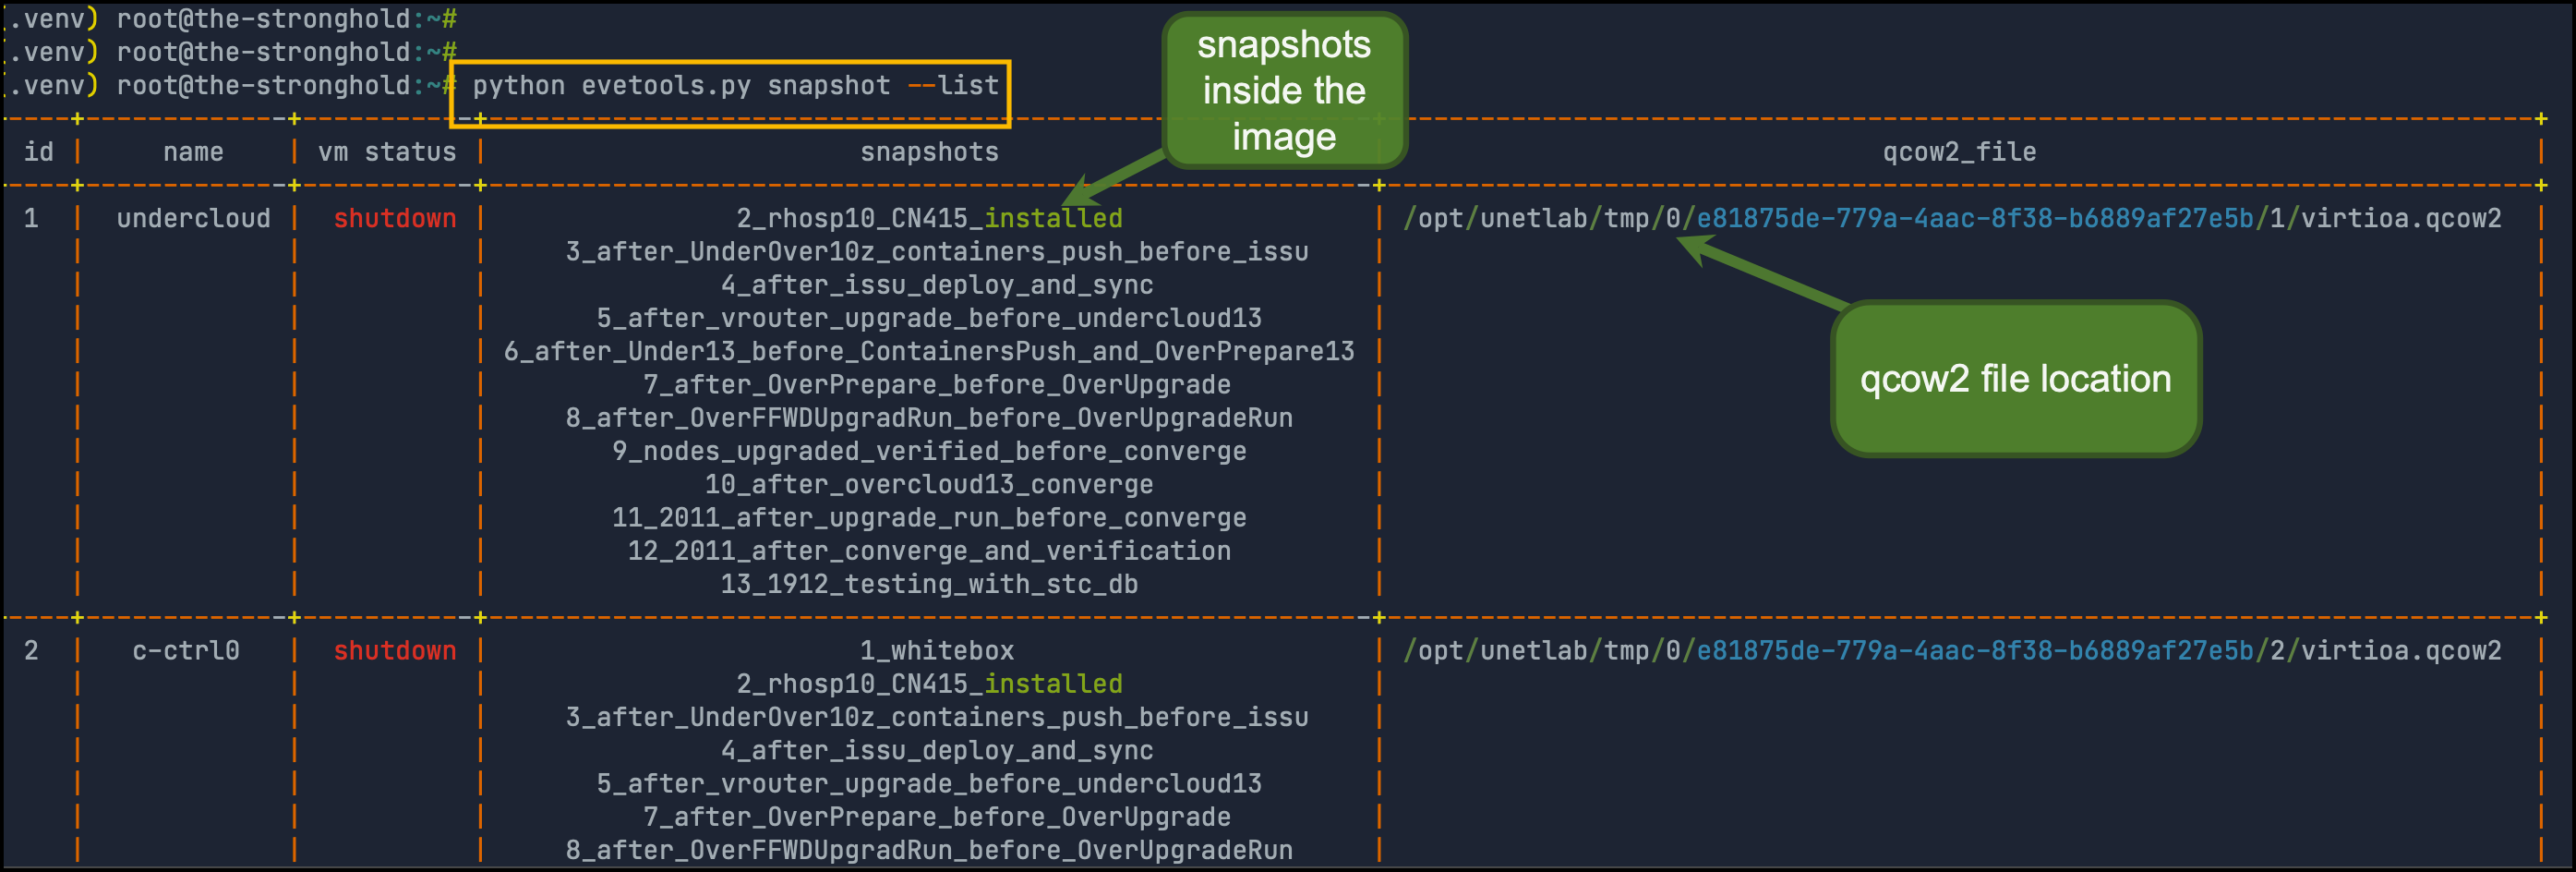
Option2: I developed a small tool to operate different EVE operations. You can find it here in GitHub. one of the operations that it supports is to list nodes inside the topology
After you copy the nodes, then You can normally bring up the lab and start using it.

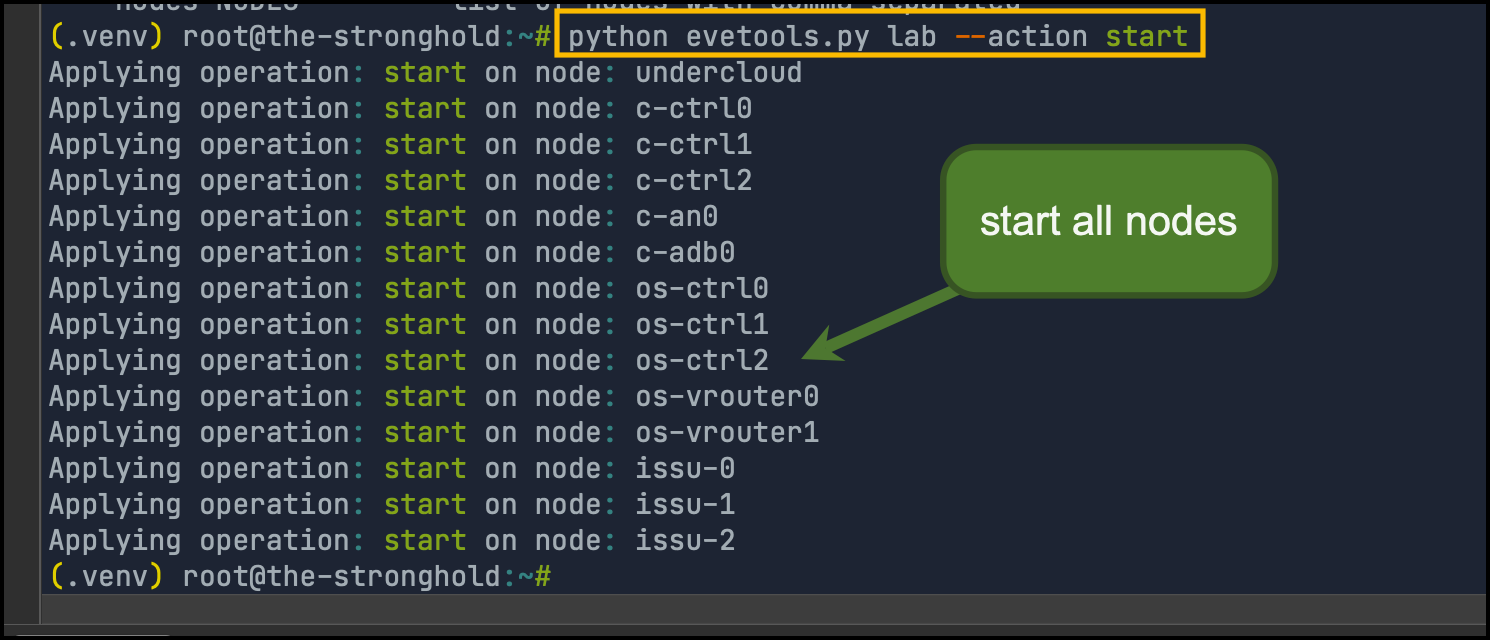
You can also use the tool to start/stop all virtual machines (or some of them). below are some examples
Start all nodes in the lab
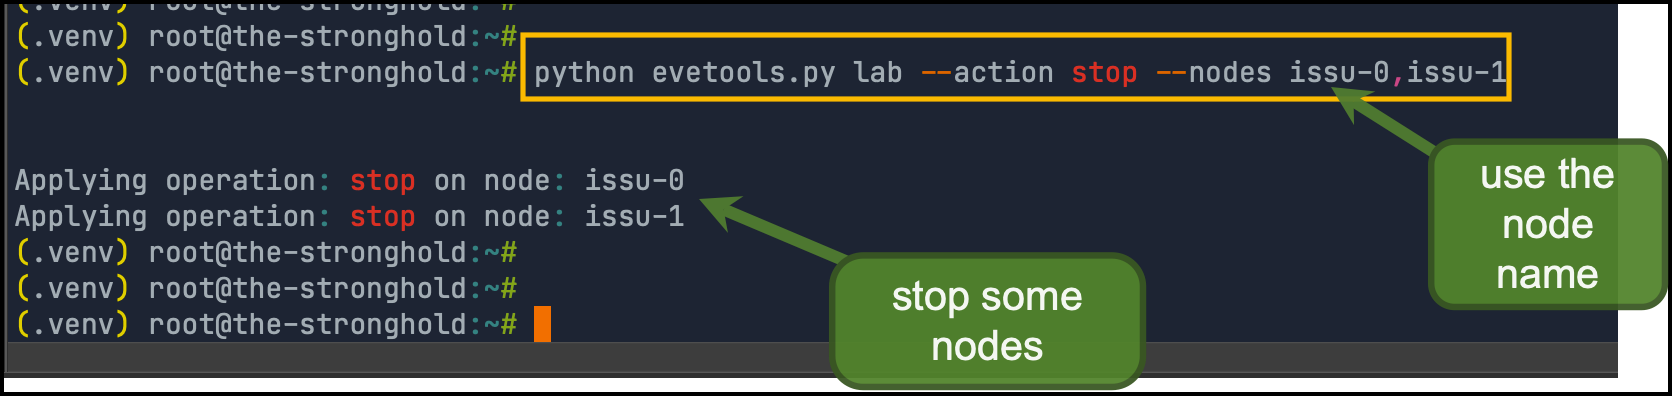
Stop some nodes (omit --nodes to stop all of them)
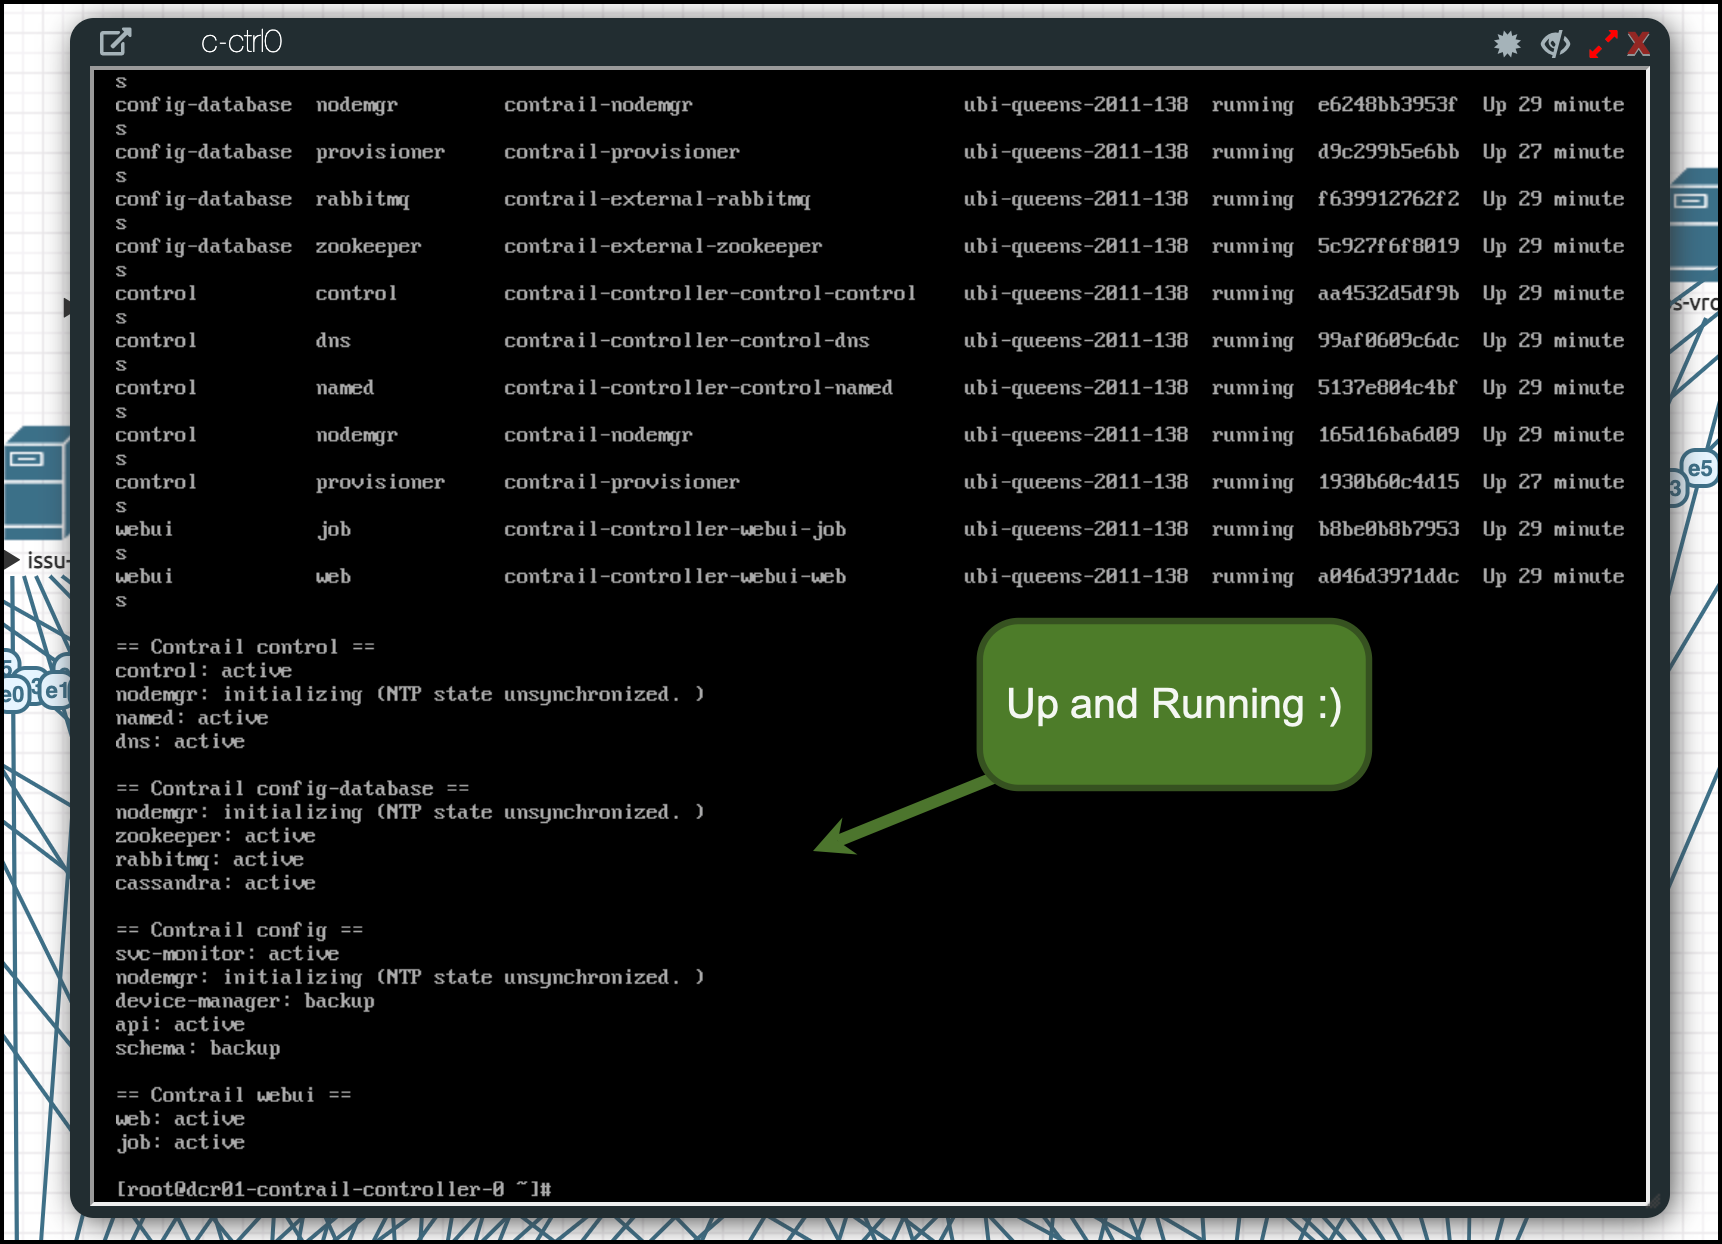
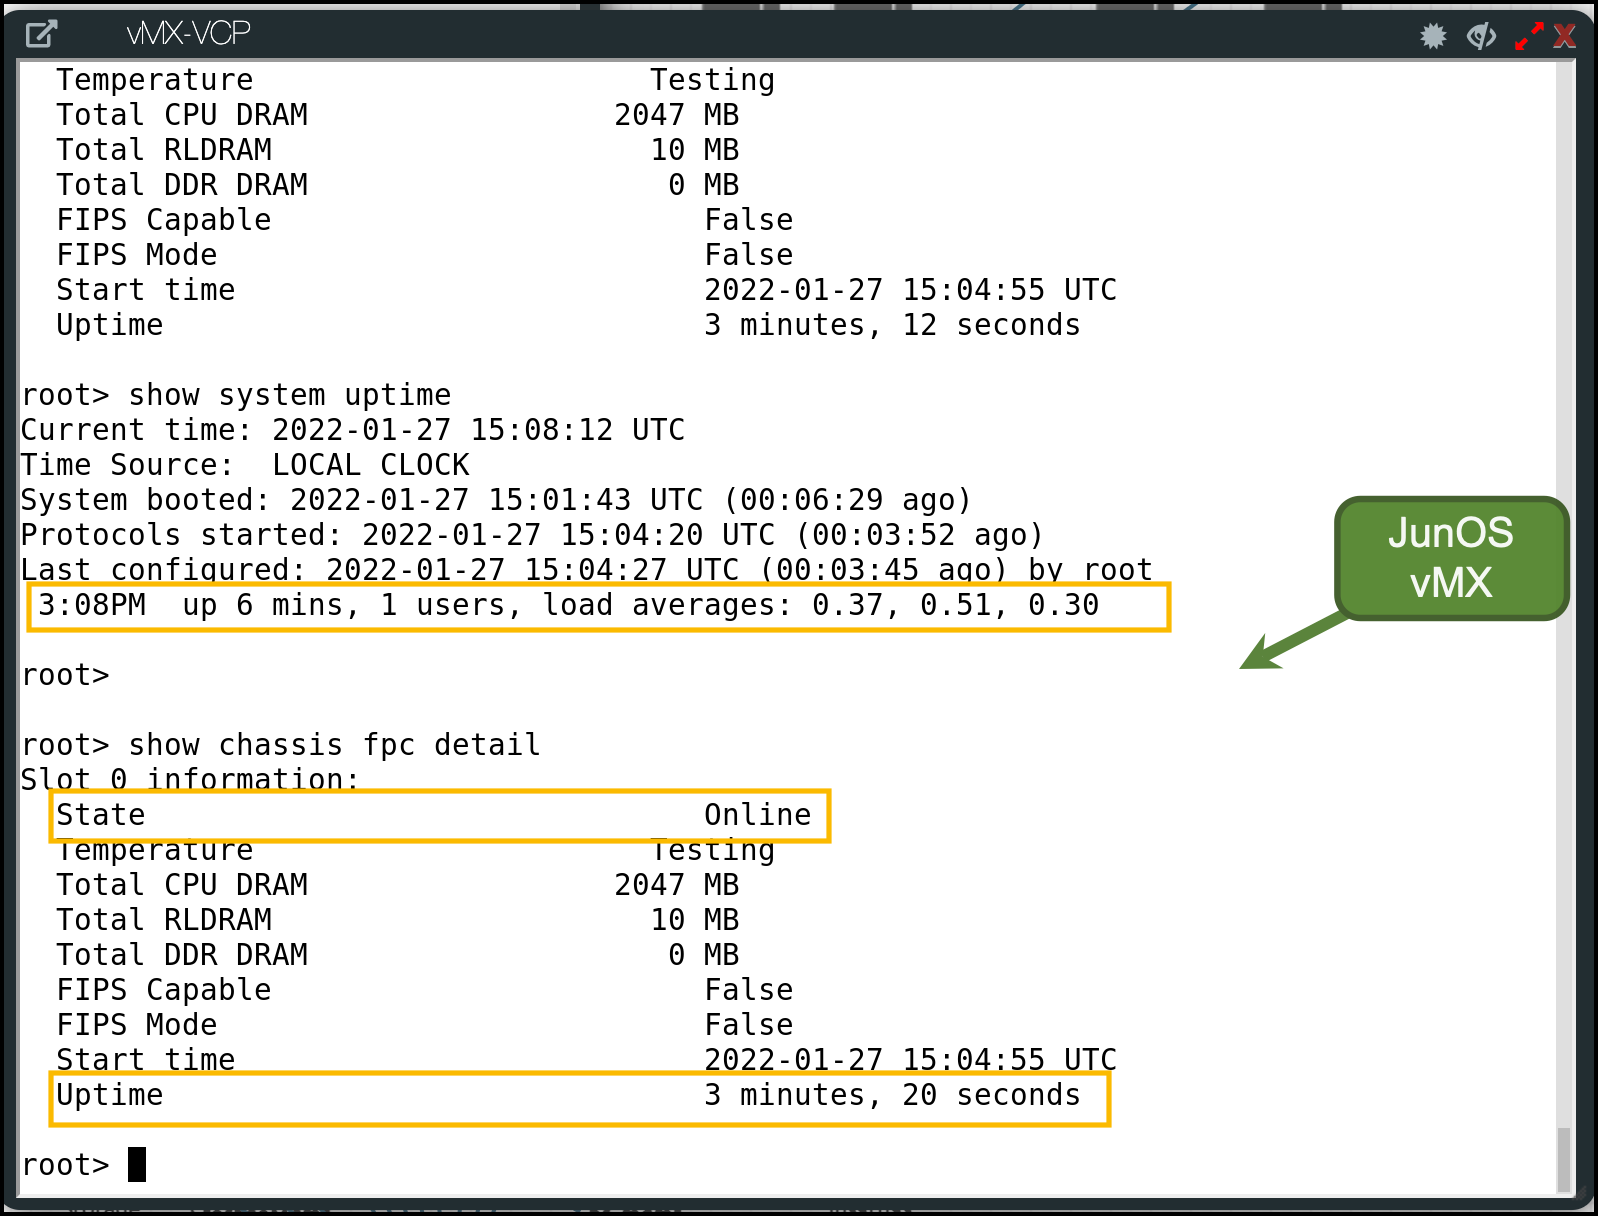
in my case, I have Juniper Contrail up and running and reporting health state 🙂
Step 6: How to solve snapshots limitation in EVE-NG?
EVE-NG is not supporting taking snapshots from the lab. it supports something called startup-config where you can define the configuration applied on the nodes once they start (such as mgmt-IP, default username, passwords..etc) but it’s not always working since it depends on pexpect module which is not that great.
Also, this might ok for network nodes. But what about the Linux VMs? there’s no way to snapshot them as we usually do in the old KVM setup
That’s why I added another operation to the tool to manage the snapshot easily in my lab. let’s quickly look into it
First this is the tool help
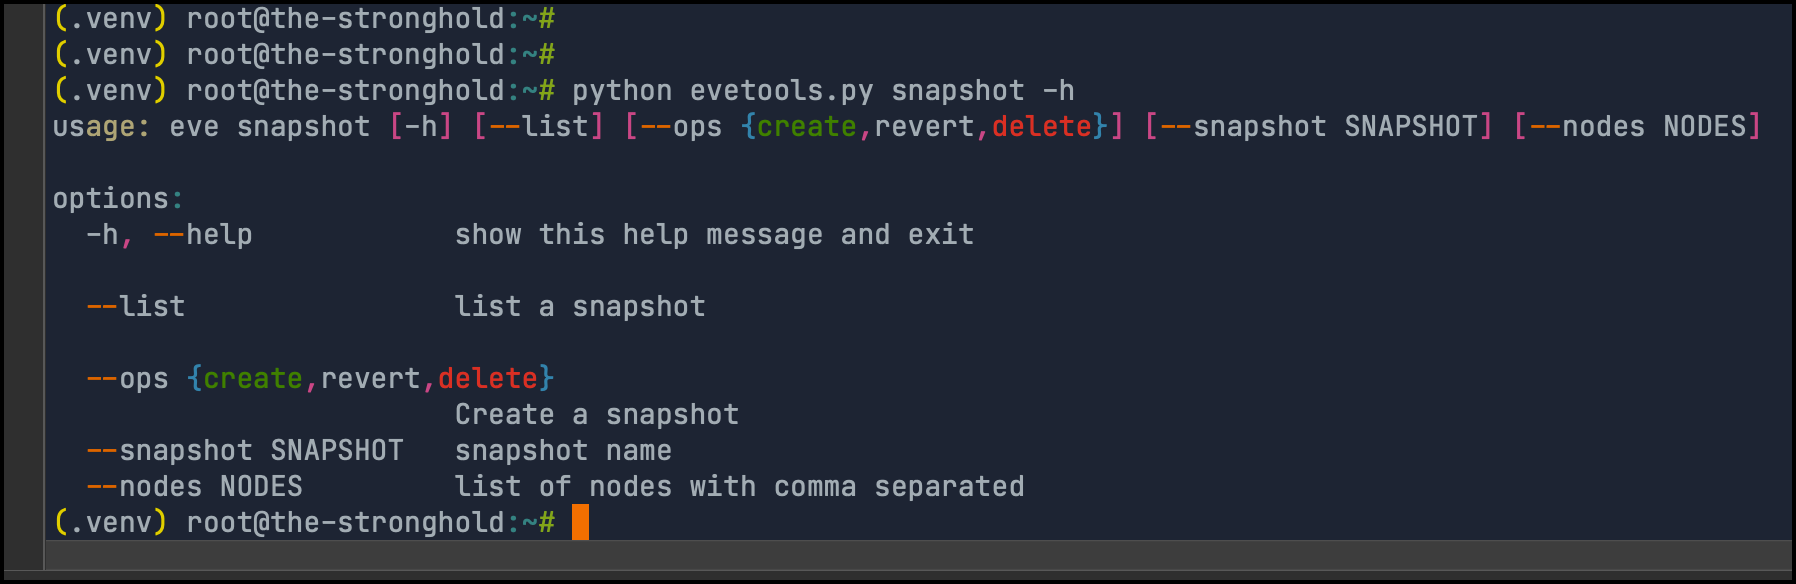
Listing snapshots : used to list node snapshots
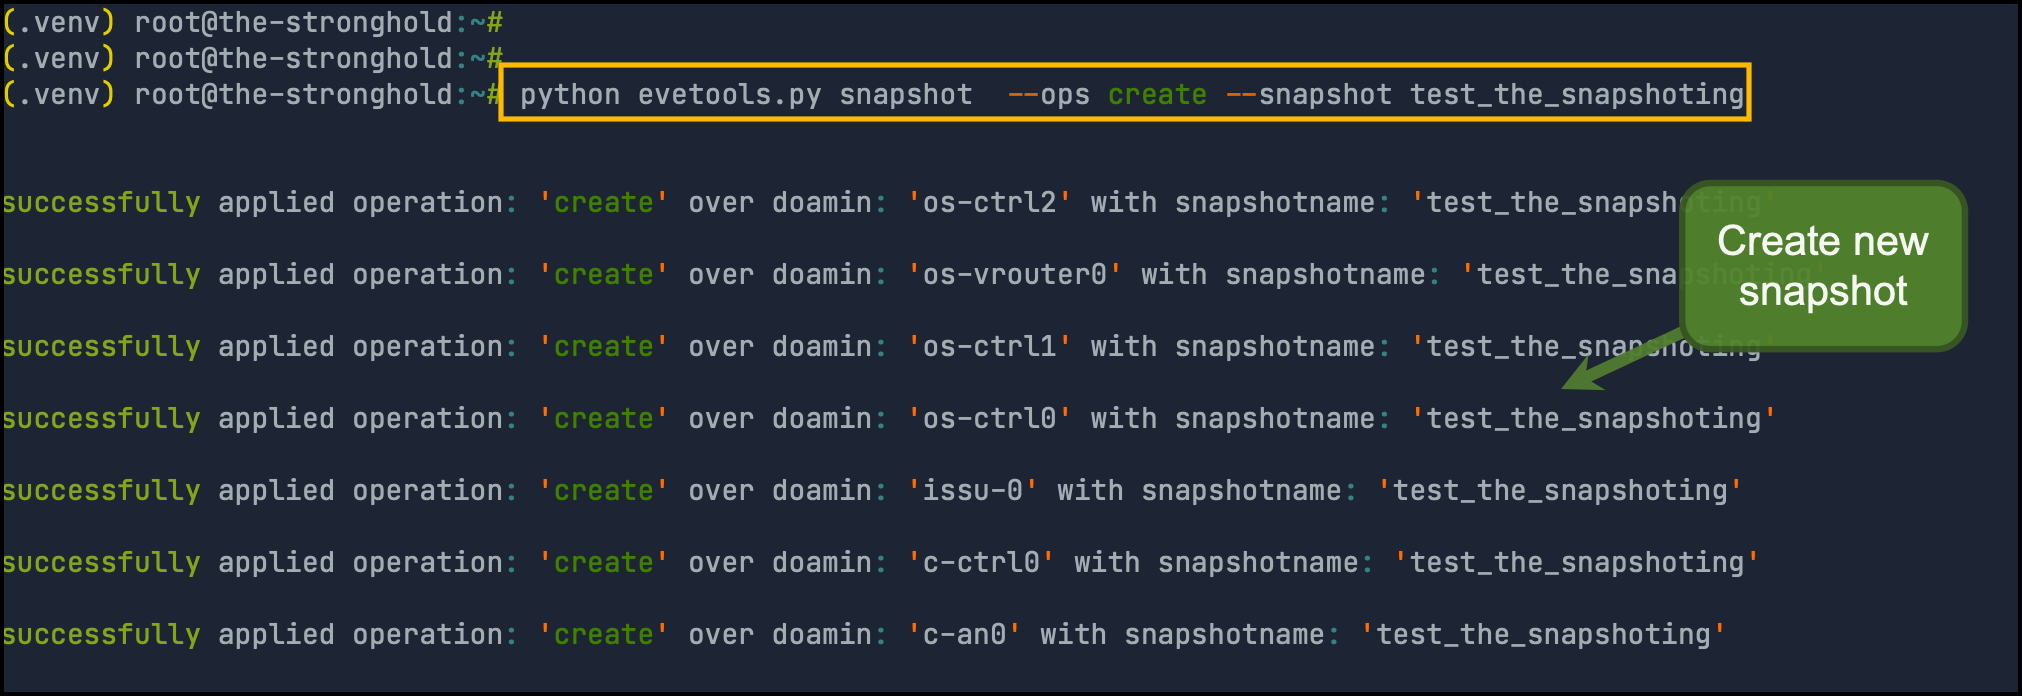
Creating new snapshot: used to create a new snapshot over all nodes in the lab. you have to provide the snapshot name
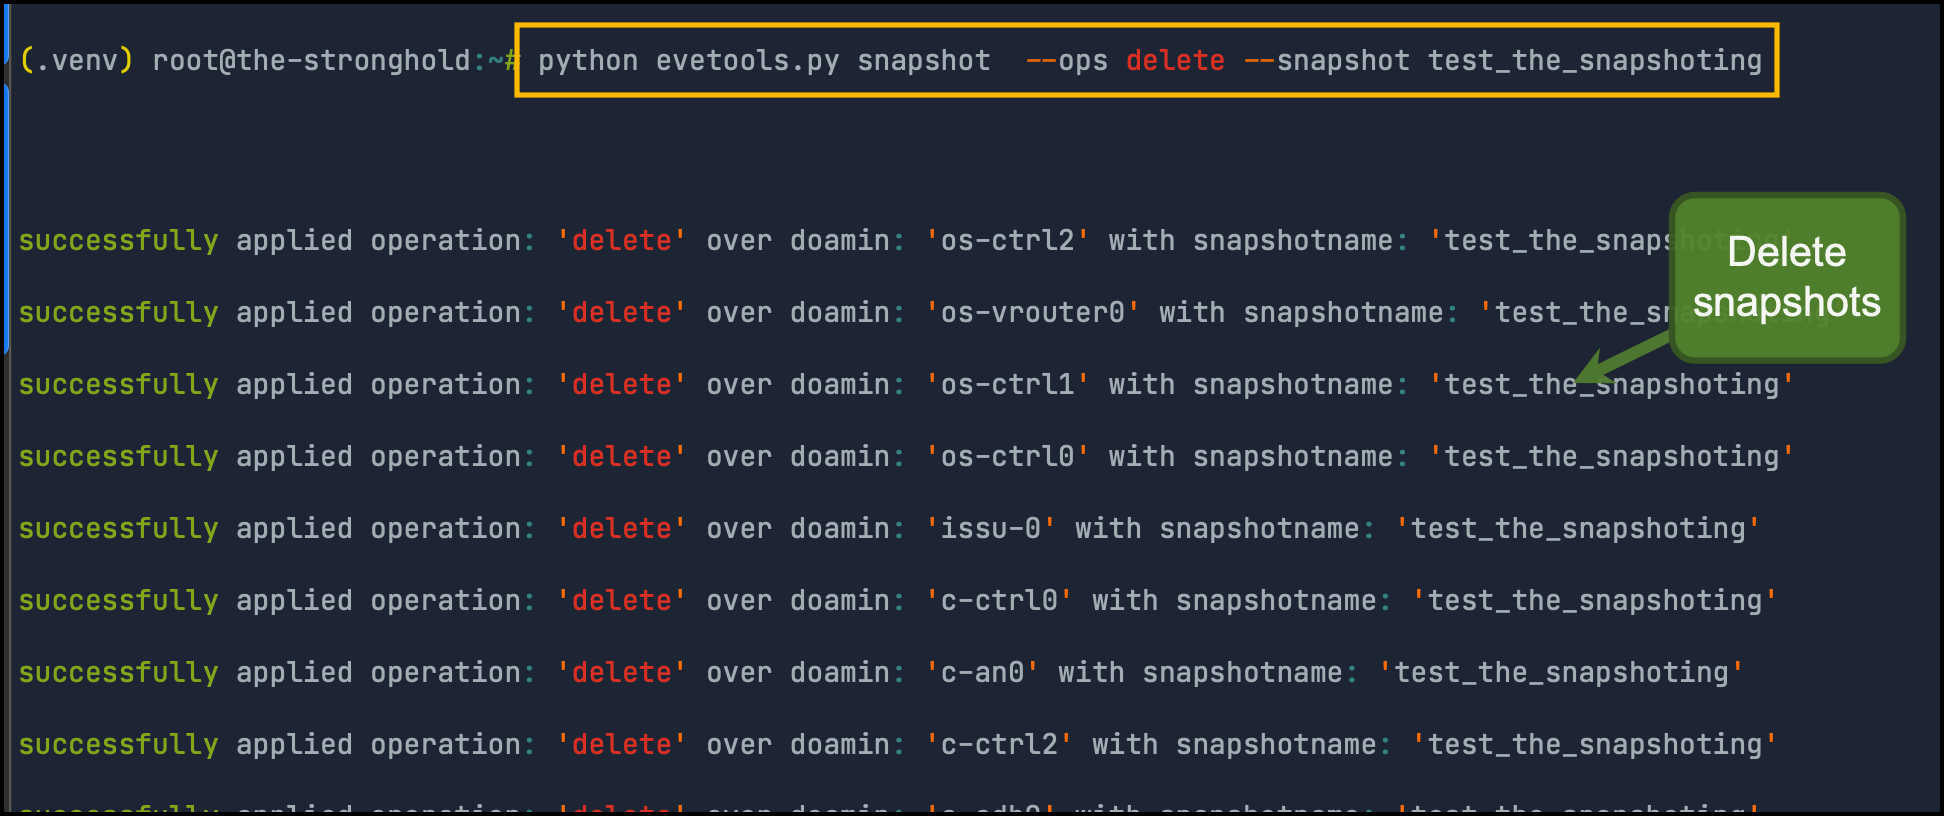
Deleting snapshots: used to delete an existing snapshot over all nodes in the lab. you have to provide the snapshot name
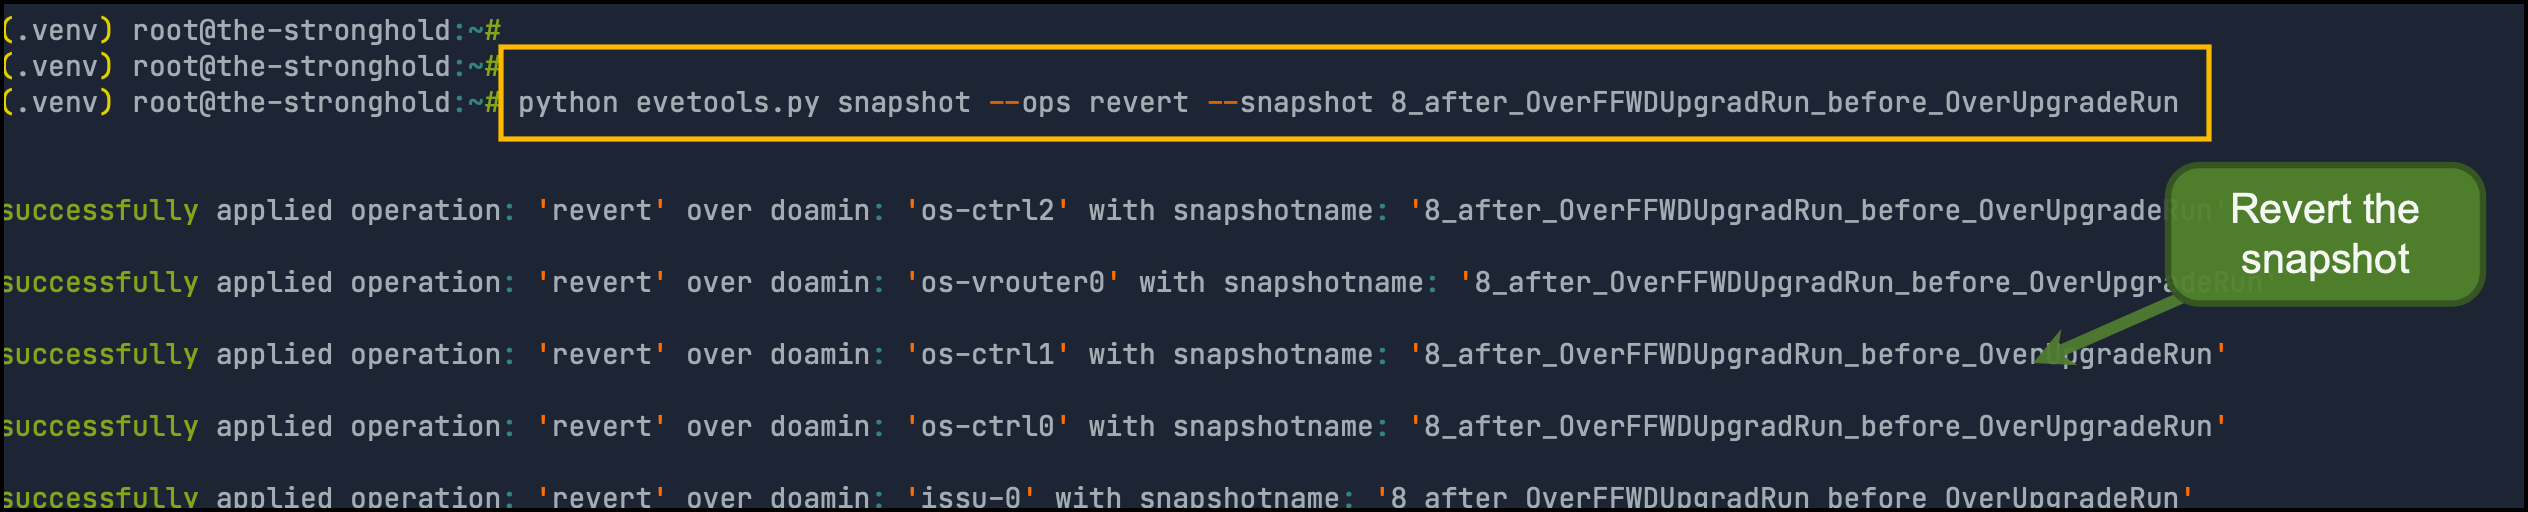
And Finally, reverting snapshot: used to revert the domain to snapshot over all nodes in the lab. you have to provide the snapshot name
So we didn’t lose any nice features from KVM while enjoying a lot of good features in EVE-NG.. Great! 🙂
You can find the GitHub repo for this tool here
Bonus Tips
Sometimes you want to try multiple versions of different images to compare behavior between them. something like you had built a lab with tens of nodes using JunOS vqfxre-10K-F-18.4R1.1 then you want to try another JunOS vqfxre-10K-F-19.3R1.1. it will be hard to rebuild all of the lab again only to change the version.
Below is a quick tip and script to do that. Here we’re copying the lab XML file to another one then doing the required changes. it’s important to notice you need to remove the lab_id from the XML file so EVE-NG generate a new one
# Go to lab directory
cd /opt/unetlab/labs/
new_file_name=EVPN-VxLAN-CEM-IaaS-Lab_19.unl #notice the .unl at the end
old_file=EVPN-VxLAN-CEM-IaaS-Lab.unl
new_re_version=vqfxre-10K-F-19.3R1.1
new_pfe_version=vqfxpfe-10K-F-19.3R1.1
# Copy lab file
cp $old_file $new_file_name
# Change the images
sed -i 's/vqfxre-10K-F-*/$new_re_version/g' /opt/unetlab/labs/$new_file_name
sed -i 's/vqfxpfe-10K-F-*/$new_pfe_version/g' /opt/unetlab/labs/$new_file_name
# Get the lab ID
lab_id=`cat $new_file_name| grep 'version="1"' | cut -d " " -f3`
echo $lab_id
# Remove the lab id
sed -e "s/$lab_id //g" -i /opt/unetlab/labs/$new_file_name #remove the id from the lab file
# Check the images
cat /opt/unetlab/labs/$new_file_name | grep image | awk -F" " '{print $6}' | sort | uniq -c
--> once you start the lab, EVE will generat ID for it
Appendix: Testing the performance
I want to put the performance of EVE-NG over bare-metal into test! . In my old setup (EVE-NG over a VM), A single node in the lab took around 17 minutes to be up and running (and almost functional, I have to reboot some nodes later if they’re stuck). I am using a lot of Junos vMX and JunOS vQFX (which are heavy) and Linux virtual machines to have datacenter interconnect lab
After migrating to bare-metal, it’s only 5 minutes. and sometimes less!. so this is like 3x times enhancements!
The Future Work
Well, My final goal is to have a fully automated workflow for my lab equipped with something like blueprints!
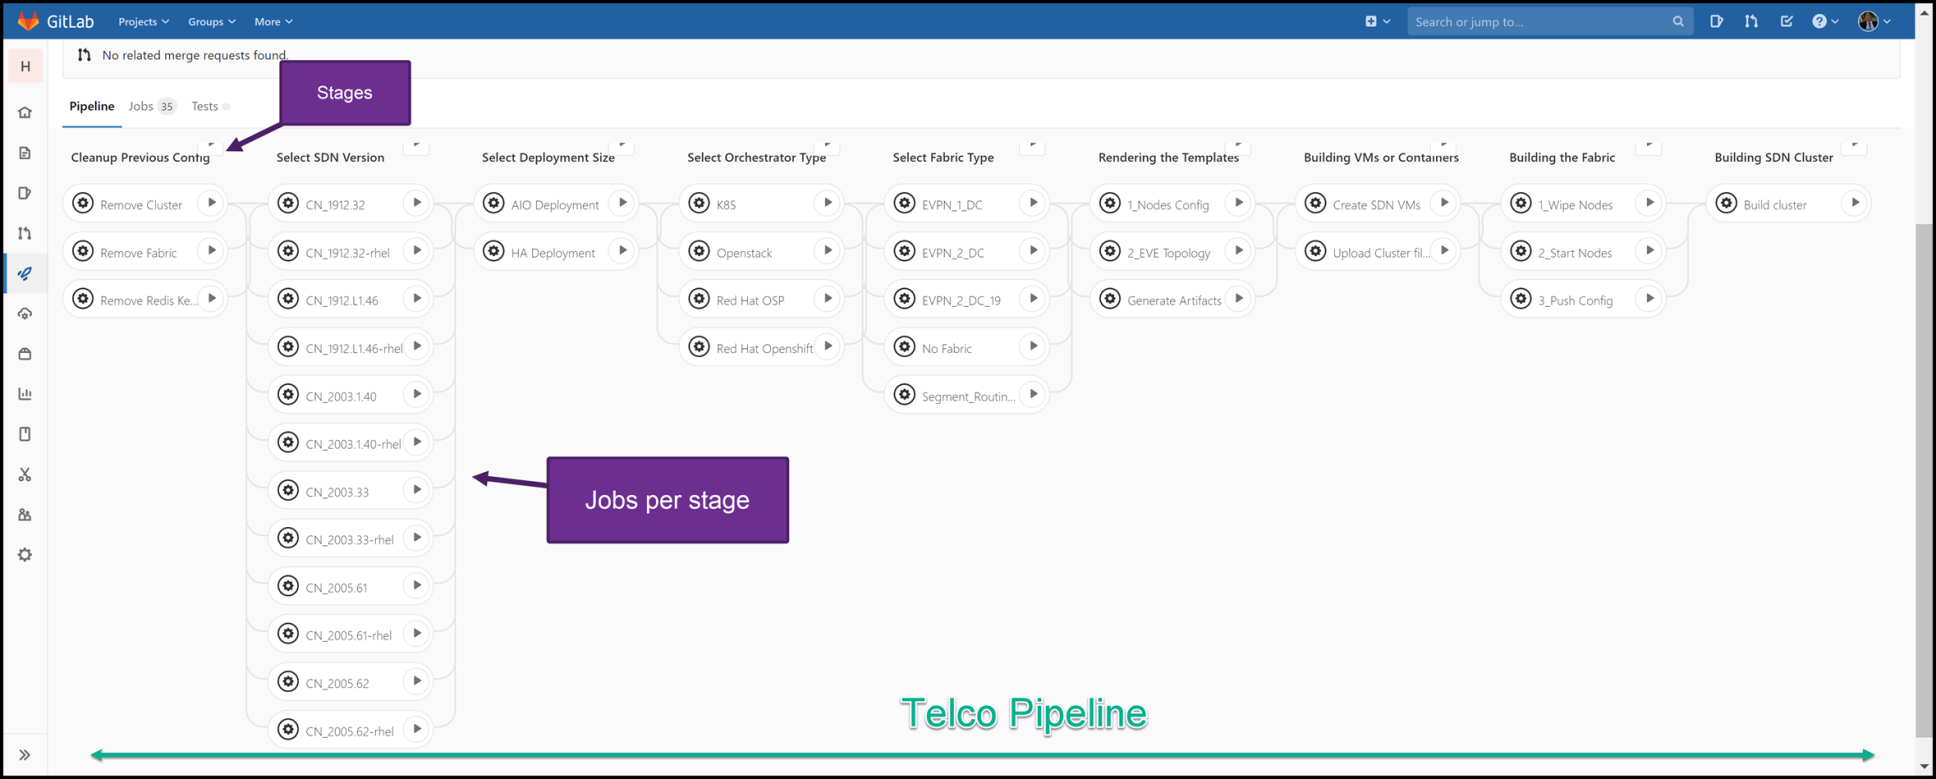
so when I choose the blueprint (such as complete openstack+sdn, k8s cluster+with different CNIs,openshift..etc), The workflow will automatically deploy the “moving parts” and make sure they’re fully up and running. I did something similar with the help of Gitlab CI/CD pipelines and I hope I can enhance it more!
Finally, I hope this will be informative for you, and I’d like to thank you for reading!


Share you opinion to benefit others :)